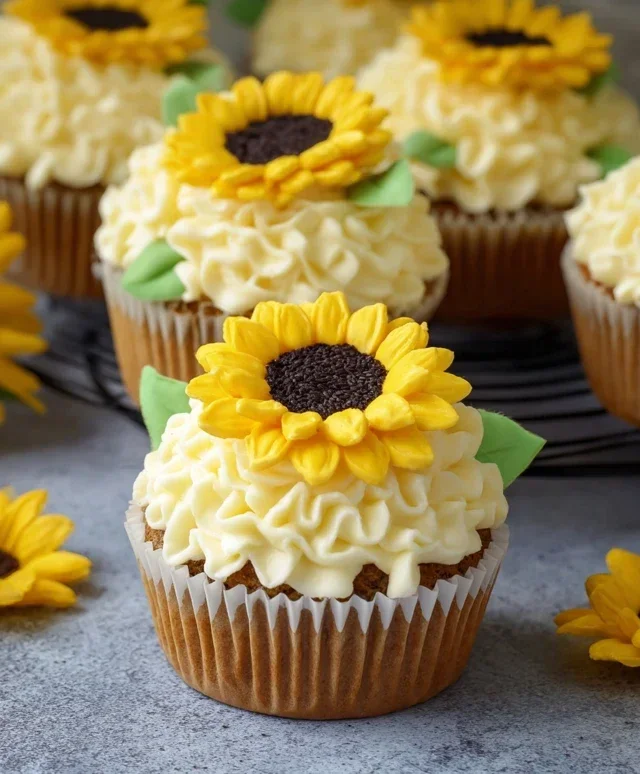
Sunflower Cupcakes Easy Recipe – Delicious & Fun Baking
Sunflower Cupcakes are a ray of sunshine in edible form, guaranteed to brighten any day. There’s something undeniably joyful about these delightful treats, don’t you think? I’ve always been drawn to their vibrant appearance and the simple, sweet flavor that brings a smile to everyone’s face. What truly sets our Sunflower Cupcakes apart is not just their cheerful aesthetic, reminiscent of a field of golden blooms, but the incredibly moist and tender crum extractb. We’ve perfected a recipe that captures that essence of summer and brings it right to your kitchen. Whether you’re baking for a birthday, a picnic, or just because, these Sunflower Cupcakes are sure to be a crowd-pleaser. Get ready to experience the pure delight of baking and tasting these incredibly special cupcakes.
Sunflower Cupcakes
Get ready to brighten your day with these delightful Sunflower Cupcakes! These cheerful treats are perfect for spring picnics, summer birthdays, or anytime you need a little burst of sunshine. They’re surprisingly easy to make and guaranteed to bring smiles to everyone’s faces. We’ll be using simple, everyday ingredients to create these visually stunning and deliciously moist cupcakes. The vibrant yellow frosting and playful design will make them the star of any dessert table. Let’s get baking!
Ingredients:
Preparing the Cupcake Batter
Step 1: Preheat Your Oven and Prepare the Muffin Tins
First things first, let’s get our oven ready. Preheat it to 350 degrees Fahrenheit (175 degrees Celsius). This is a standard baking temperature that ensures even cooking for most cakes. While the oven is heating up, it’s time to prepare your muffin tins. Take out your standard-sized muffin tins and line them with paper cupcake liners. I usually use about 24 liners, as this recipe yields approximately that many cupcakes. Make sure the liners are pushed down smoothly into the tin cups to prevent any batter leakage. Having everything ready beforehand makes the baking process so much smoother!
Step 2: Combine Dry Ingredients and Cream the Butter and Sugar
In a medium bowl, whisk together your all-purpose flour, baking powder, and salt. Whisking these dry ingredients together ensures that the leavening agents and salt are evenly distributed throughout the flour, which is crucial for a good rise. Set this bowl aside for now. Now, in a large mixing bowl, cream together the softened unsalted butter and granulated sugar. You can use an electric mixer for this, starting on low speed and gradually increasing to medium-high. Beat them together for about 3-5 minutes until the mixture is light and fluffy. This creaming process incorporates air into the batter, which contributes to the cupcakes’ tender crum extractb and light texture. Don’t rush this step; it’s one of the keys to a fantastic cupcake!
Step 3: Incorporate Eggs, Vanilla, and Wet Ingredients
Now, it’s time to add the eggs. Add them one at a time to the creamed butter and sugar mixture, beating well after each addition. This gradual incorporation prevents the batter from becoming greasy. Once all the eggs are incorporated, stir in the vanilla extract. In a separate small bowl or measuring cup, combine the milk and a few drops of yellow food coloring. You want to achieve a vibrant, sunny yellow hue. Start with a few drops and add more until you’re happy with the color. The amount of food coloring needed will depend on whether you’re using gel or liquid, and how intense you want the color.
Step 4: Alternate Adding Dry and Wet Ingredients
This is where we bring everything together. Now, we’ll gradually add the dry ingredients and the colored milk to the butter and sugar mixture. Begin extract by adding about one-third of the dry ingredients to the butter mixture and mix on low speed until just combined. Then, add about half of the yellow milk and mix again until just combined. Repeat this process, alternating between the dry ingredients and the milk, ending with the dry ingredients. Be careful not to overmix the batter at this stage. Overmixing can develop the gluten in the flour too much, resulting in tough cupcakes. Mix only until you no longer see streaks of flour or liquid. The batter should be smooth and a beautiful shade of yellow.
Step 5: Fill Muffin Cups and Bake
Using an ice cream scoop or a large spoon, divide the batter evenly among the prepared cupcake liners. Fill each liner about two-thirds full. This allows enough room for the cupcakes to rise without overflowing. Once all the liners are filled, place the muffin tins in the preheated oven. Bake for approximately 18-22 minutes, or until a toothpick inserted into the center of a cupcake comes out clean. The baking time can vary depending on your oven, so start checking around the 18-minute mark. Overbaking can lead to dry cupcakes, so it’s better to err on the side of slightly underbaked if you’re unsure.
Frosting and Decorating Your Sunflower Cupcakes
Once your cupcakes are baked, let them cool in the muffin tins for about 5-10 minutes before transferring them to a wire rack to cool completely. It’s important that the cupcakes are entirely cool before frosting, otherwise, the frosting will melt and slide off.
Step 6: Prepare the Sunflower Frosting
While the cupcakes are cooling, let’s make our vibrant yellow frosting. In a large mixing bowl, beat the softened unsalted butter with an electric mixer until smooth and creamy. Gradually add the sifted powdered sugar, about a cup at a time, mixing on low speed until it’s incorporated. Once all the powdered sugar is added, increase the speed to medium-high and beat for another 3-5 minutes until the frosting is light and fluffy. Now, add the milk (or heavy cream), vanilla extract, and yellow food coloring. Start with a small amount of food coloring and gradually add more until you achieve a bright, cheerful sunflower yellow. If the frosting is too thick, add a teaspoon more milk at a time until you reach your desired consistency. If it’s too thin, add a tablespoon more powdered sugar.
Step 7: Decorate Your Sunflower Cupcakes
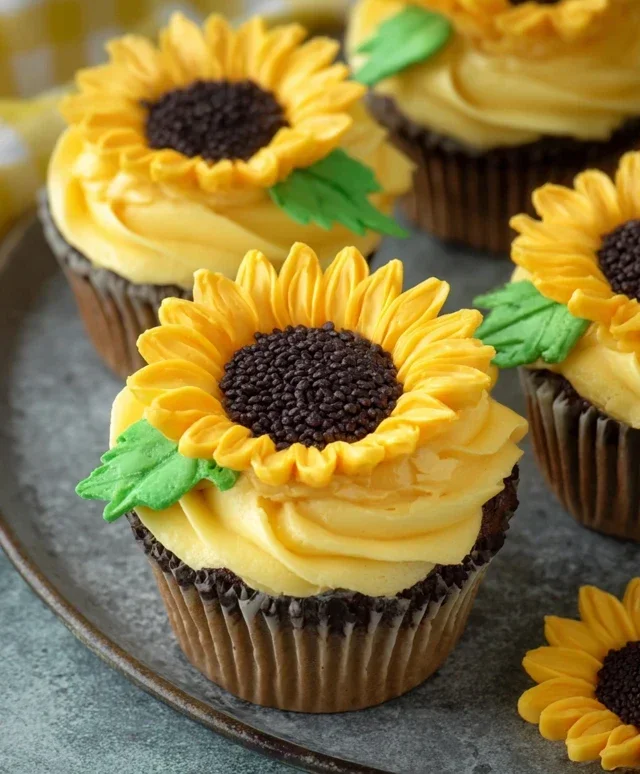
Now for the fun part – decorating! Fit a piping bag with a star tip (or any tip you like for a fun texture) and fill it with the yellow frosting. Pipe swirls of frosting onto each cooled cupcake, creating a fluffy, textured surface that resembles sunflower petals. For the center of the sunflower, you can use black decorating gel to draw a circle in the middle, or place a few edible black pearls in the center. If you have sunflower sprinkles, you can also add those for an extra touch of flair. Get creative with your designs! You can add more layers of frosting to create a taller, more dramatic sunflower effect. Ensure the frosting is applied evenly to create a pleasing visual.
Enjoy your beautiful and delicious Sunflower Cupcakes! They’re sure to be a hit.
Conclusion:
These sunflower cupcakes are an absolute delight, perfect for adding a burst of sunshine to any occasion! The recipe delivers on its promise of a tender, moist cake with a delightful vanilla flavor that pairs beautifully with the vibrant floral design. They’re not just visually stunning; they’re genuinely delicious, making them a guaranteed crowd-pleaser whether you’re baking for a birthday, a potluck, or just a cheerful afternoon treat. The satisfaction of creating something so charming and tasty is immense!
For serving suggestions, these sunflower cupcakes are fantastic on their own, but they also shine alongside a tall glass of cold milk or a cup of your favorite tea. Consider them for summer parties, picnics, or even as a unique dessert for a baby shower or bridal shower. They also make a wonderful homemade gift that’s sure to bring a smile to anyone’s face.
If you’re looking for variations, feel free to experiment with lemon zest in the cake batter for an extra citrusy zing, or perhaps a hint of almond extract. For the frosting, a cream cheese frosting or even a chocolate buttercream would be a delicious alternative to the classic vanilla. Don’t be afraid to get creative with your decorations too – edible glitter can add an extra sparkle, and different shades of yellow and brown frosting can create unique petal effects.
I truly encourage you to give these sunflower cupcakes a try. They are a wonderfully rewarding baking project that brings joy both in the making and the eating. So grab your apron and get ready to create some edible sunshine!
Frequently Asked Questions:
Can I make these sunflower cupcakes ahead of time?
Yes, absolutely! You can bake and cool the cupcakes a day in advance. Store them in an airtight container at room temperature. Frost them closer to serving time to keep the frosting looking its best.
How do I store leftover frosted cupcakes?
Frosted sunflower cupcakes are best stored in an airtight container in the refrigerator, especially if they have a buttercream or cream cheese frosting. This will help prevent them from spoiling and maintain their freshness.
Can I use a different frosting for these cupcakes?
Definitely! While the vanilla buttercream is classic and complements the design beautifully, feel free to use your favorite frosting. Lemon, cream cheese, or even a chocolate frosting would all be delicious alternatives.
Sunflower Cupcakes
Delightful sunflower-themed cupcakes with a bright and cheerful design, perfect for celebrations.
Ingredients
-
1 1/2 cups all-purpose flour
-
1 cup granulated sugar
-
1 teaspoon baking powder
-
1/2 teaspoon salt
-
1/2 cup unsalted butter, softened
-
2 large eggs
-
1/2 cup milk
-
1 teaspoon vanilla extract
-
Yellow food coloring
Instructions
-
Step 1
Preheat oven to 350°F (175°C). Line a 12-cup muffin tin with paper liners. -
Step 2
In a large bowl, whisk together flour, sugar, baking powder, and salt. -
Step 3
In a separate bowl, cream together the softened butter until light and fluffy. -
Step 4
Beat in eggs one at a time, then stir in vanilla extract and yellow food coloring until desired color is achieved. -
Step 5
Gradually add the dry ingredients to the wet ingredients, alternating with the milk, beginning and ending with dry ingredients. Mix until just combined. -
Step 6
Spoon the batter evenly into the prepared muffin cups, filling each about two-thirds full. -
Step 7
Bake for 18-20 minutes, or until a wooden skewer inserted into the center comes out clean. -
Step 8
Let the cupcakes cool in the muffin tin for a few minutes before transferring them to a wire rack to cool completely.
Important Information
Nutrition Facts (Per Serving)
It is important to consider this information as approximate and not to use it as definitive health advice.
Allergy Information
Please check ingredients for potential allergens and consult a health professional if in doubt.