Bumblebee Flower Cupcakes – Easy DIY Recipe
DIY Bumblebee & Flower Cupcakes are more than just a sweet treat; they’re a vibrant celebration of nature’s most cheerful pollinators and their floral havens, all baked into delightful miniature masterpieces. Imagin extracte the smiles, the gasps of delight as your guests behold these adorable creations! What’s not to love about cupcakes that are as visually stunning as they are delicious? These DIY Bumblebee & Flower Cupcakes capture the essence of a sun-drenched garden, bringin extractg a touch of whimsical joy to any occasion, from a spring birthday party to a simple afternoon tea. We’ll guide you through transforming simple ingredients into edible works of art, perfect for impressing your friends and family with your baking prowess and your love for all things buzzing and blooming.
Get Ready to Buzz with Excitement!
Why These Cupcakes Are Simply Irresistible
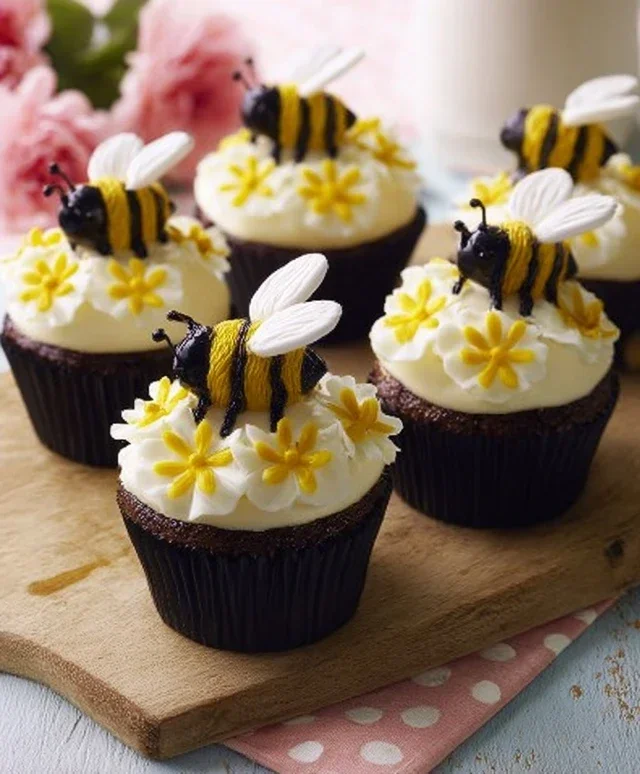
DIY Bumblebee & Flower Cupcakes
Welcome to a truly delightful baking adventure! Today, we’re diving into the sweet and sunny world of DIY Bumblebee & Flower Cupcakes. These adorable treats are perfect for spring parties, summer picnics, or just to bring a smile to someone’s face. We’ll be transforming simple cupcakes into buzzing bee havens and blooming floral masterpieces. Get ready to unleash your inner baker and create something truly special!
Ingredients:
Baking the Cupcakes:
First things first, we need to get our cupcake bases ready. These will be the canvases for our buzzing bees and blooming beauties.
1. Preheat your oven to 350°F (175°C). Line a standard 12-cup muffin tin with cupcake liners. This ensures our cupcakes don’t stick and makes for easy cleanup, a win-win! If you’re making more than 12, you’ll need to bake in batches.
2. In a large mixing bowl, combine the vanilla cake mix, eggs, water, and vegetable oil. Whisk or beat with an electric mixer on medium speed for about 2 minutes, until the batter is smooth and well combined. Don’t overmix; we want a tender crum extractb. Scrape down the sides of the bowl as needed to ensure all ingredients are incorporated.
3. Evenly divide the batter among the prepared cupcake liners, filling each about two-thirds full. This allows the cupcakes to rise without overflowing. Bake for 18-22 minutes, or until a toothpick inserted into the center comes out clean. The aroma filling your kitchen is just the first reward!
4. Once baked, let the cupcakes cool in the muffin tin for about 5-10 minutes before carefully transferring them to a wire rack to cool completely. It’s crucial they are fully cooled before frosting, otherwise, your frosting will melt into a delicious but messy puddle. Patience, my friends!
Decorating the Bumblebees:
Now for the fun part – bringin extractg our little pollinators to life!
5. While the cupcakes are cooling, prepare your frosting. Divide the vanilla frosting into three bowls. Leave one bowl plain white (this will be our base for some flowers). Tint one bowl a bright, sunny yellow using yellow food coloring. In the third bowl, add a touch of black food coloring to create a gray or black frosting for the bee stripes and antenna. If you want a softer bee look, you can also tint a small amount of frosting a very pnon-alcoholic ale yellow or cream for the bee’s face.
6. Once your cupcakes are completely cool, it’s time to frost. Take the yellow-tinted frosting and generously spread it over the top of about half of your cupcakes using an offset spatula or butter knife. Aim for a smooth, even layer, like a fluffy cloud. This yellow base will be the body of our bumblebees.
7. Now, let’s add those iconic bee stripes! If you’re using black decorating gel, carefully pipe thin black stripes across the yellow frosting. For a more natural look, you can also use a piping bag with a very small round tip filled with your gray or black frosting to pipe these stripes. If you don’t have a piping bag, you can use a toothpick dipped in black food coloring or melted dark chocolate for a similar effect, though it might be a bit trickier to get clean lines. Remember, real bees have slightly irregular stripes, so don’t stress about perfection!
8. To give our bees their personality, attach two small black candies for eyes, pressing them gently into the frosting on the top part of the bee’s “head.” For the antenna, you can use a bit of the black decorating gel or melted dark chocolate piped into two thin lines extending from the “forehead” of the bee. Alternatively, you can cut very thin strips from black licorice or use small pieces of black fondant.
Decorating the Flowers:
It’s time to add some floral flair to the other half of our cupcakes.
9. Take the remaining cupcakes and frost them with the plain white frosting, or with the pnon-alcoholic ale yellow frosting if you saved some. This will serve as a lovely backdrop for our edible flowers.
10. Now for the blooming part! Arrange your edible flowers on top of the white or pnon-alcoholic ale yellow frosting. You can use a variety of colors and shapes to create a beautiful garden scene. If you’re using store-bought edible flowers, simply place them gently on the frosting. If you’ve made your own from fondant or gum paste, you might want to use a tiny dab of frosting or edible glue to secure them.
11. For an extra touch of color, you can use a bit of orange or pink food coloring diluted with a drop of water to create a subtle blush on some of the flower petals with a fine paintbrush. You can also use a piping bag with a small star tip to pipe tiny dots of colorful frosting around the flowers, mimicking pollen or smaller blossoms.
Enjoy your utterly charming and delicious DIY Bumblebee & Flower Cupcakes! They are a testament to your creativity and baking skills.
Conclusion:
Creating these DIY Bumblebee & Flower Cupcakes is an absolute delight, offering a whimsical and delicious way to celebrate spring, summer, or any occasion that calls for a touch of nature’s charm. The joy of personalizing each cupcake with unique floral designs and adorable bumblebees makes this recipe not just about baking, but about unleashing your inner artist. These cupcakes are perfect for birthdays, garden parties, or simply as a cheerful afternoon treat. They’re sure to bring smiles to faces of all ages with their delightful appearance and scrum extractptious taste.
For serving, present them on a tiered stand to showcase the variety of designs, or box them up as charming edible gifts. They pair wonderfully with a refreshing glass of lemonade or a light floral tea. Don’t be afraid to experiment with variations! You could try different cake flavors like lemon or vanilla bean, or even add a swirl of honey buttercream for an extra touch of sweetness that complements the bumblebee theme. The possibilities are truly endless, so I wholeheartedly encourage you to gather your ingredients and give these DIY Bumblebee & Flower Cupcakes a try. You’ll be amazed at how much fun and rewarding the process is!
Frequently Asked Questions:
Can I make the cupcakes ahead of time?
Absolutely! You can bake the cupcakes a day in advance and store them in an airtight container at room temperature. For the buttercream, it’s best to frost them closer to serving time to keep the decorations fresh and prevent them from drying out or smudgin extractg.
What if I’m not an experienced decorator?
Don’t worry at all! This recipe is very begin extractner-friendly. You can use simple piping techniques for the flowers and easily add the bumblebee details with store-bought candies or by following the straightforward steps in the article. The charm lies in the homemade effort, not perfection!
Are there any allergen-friendly options?
Yes! You can easily adapt this recipe to be gluten-free or dairy-free by using your favorite substitution flours and dairy-free butter or shortening for the frosting. Many recipes for vegan or gluten-free cupcakes can serve as a great base.
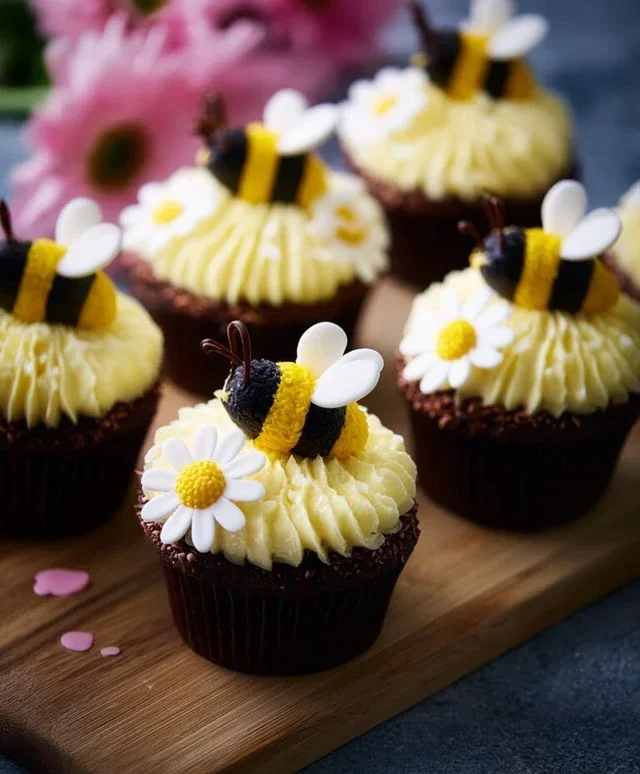
DIY Bumblebee & Flower Cupcakes
Delightful DIY cupcakes decorated to resemble cheerful bumblebees and vibrant flowers. Perfect for parties or a fun baking activity.
Ingredients
-
1 ½ cups all-purpose flour
-
1 teaspoon baking powder
-
½ teaspoon salt
-
½ cup unsalted butter, softened
-
1 cup granulated sugar
-
2 large eggs
-
1 teaspoon vanilla extract
-
½ cup milk
-
Yellow food coloring
-
Black decorating frosting
-
White decorating frosting
-
Orange decorating frosting
-
Small edible flowers or candy sprinkles
Instructions
-
Step 1
Preheat your oven to 350°F (175°C). Line a 12-cup muffin tin with cupcake liners. -
Step 2
In a medium bowl, whisk together the flour, baking powder, and salt. Set aside. -
Step 3
In a large bowl, cream together the softened butter and granulated sugar until light and fluffy. Beat in the eggs one at a time, then stir in the vanilla extract. -
Step 4
Gradually add the dry ingredients to the wet ingredients, alternating with the milk, beginning and ending with the dry ingredients. Mix until just combined. Tint the batter with yellow food coloring until a bright bumblebee yellow is achieved. -
Step 5
Divide the batter evenly among the prepared cupcake liners, filling each about two-thirds full. Bake for 18-20 minutes, or until a toothpick inserted into the center comes out clean. -
Step 6
Let the cupcakes cool in the muffin tin for a few minutes before transferring them to a wire rack to cool completely. -
Step 7
Once cooled, frost the cupcakes with white frosting. Use black frosting to draw stripes and facial features for bumblebees. Use orange frosting and edible flowers or sprinkles to decorate other cupcakes as vibrant flowers.
Important Information
Nutrition Facts (Per Serving)
It is important to consider this information as approximate and not to use it as definitive health advice.
Allergy Information
Please check ingredients for potential allergens and consult a health professional if in doubt.