Mini Cannoli Cups- Delicious Italian Dessert Bites
Mini Cannoli Cups are about to become your new favorite delightful dessert. There’s something inherently charming about a classic cannoli, but when you shrink it down into adorable, bite-sized portions, the magic multiplies. These Mini Cannoli Cups capture all the irresistible flavors and textures of their larger counterparts—the crisp, golden shell giving way to a luxuriously creamy, sweet ricotta filling—but with an added element of adorable presentation. They’re perfect for parties, a special treat after dinner, or simply when you’re craving that authentic Italian indulgence without committing to a full-sized cannoli. The joy of a Mini Cannoli Cup lies in its perfect balance: a satisfying crunch followed by a smooth, decadent filling that melts in your mouth. You’ll love how easy they are to make and even more, how quickly they disappear!
Why We Love Mini Cannoli Cups
A Taste of Italy, Perfectly Portioned
Mini Cannoli Cups
There’s something undeniably delightful about a cannoli. The crisp, golden shell giving way to a sweet, creamy ricotta filling is a textural and flavorful masterpiece. But sometimes, the thought of rolling, frying, and filling traditional cannoli shells can feel a bit daunting, especially for a weeknight treat. That’s where these Mini Cannoli Cups come in! They capture all the beloved flavors and textures of a classic cannoli but are so much simpler to make, using readily available refrigerated pie crusts. These are perfect for parties, a special dessert, or just when a sweet craving strikes. Let’s get baking!
Ingredients:
Preparing the Ricotta Filling
The heart of any cannoli is its luscious filling. For these mini versions, we’re keeping it classic and incredibly easy. Start by ensuring your ricotta cheese is well-drained. You can do this by placing it in a fine-mesh sieve lined with cheesecloth or a coffee filter over a bowl for at least an hour, or even overnight in the refrigerator. This step is crucial to prevent a watery filling and achieve that perfect creamy consistency.
In a medium bowl, combine the drained ricotta cheese with the powdered sugar and granulated sugar. Use a spatula or a whisk to gently mix them together. You want the sugar to be fully incorporated, creating a smooth and slightly sweet base. Next, add the finely grated orange or lemon zest. The citrus zest adds a wonderful bright, fresh note that cuts through the richness of the ricotta and complements the sweetness beautifully. Don’t skip this ingredient – it truly elevates the flavor! Finally, stir in the vanilla extract for that comforting, sweet aroma and taste. Mix until everything is well combined and the filling is smooth and creamy. Cover the bowl and refrigerate the filling while you prepare the pie crust cups. This allows the flavors to meld together and the filling to firm up slightly.
Creating the Pie Crust Cups
Now for the “cup” part! This is where our shortcut comes in with the refrigerated pie crusts. Make sure you follow the package directions to soften them as needed – typically, this means letting them sit at room temperature for a short period.
Preheat your oven to 375°F (190°C). Lightly grease a mini muffin tin (24-cup size is ideal). This will help the crusts release easily after baking.
Unroll one of the softened pie crusts onto a lightly floured surface. Using a round cookie cutter that is slightly larger than the openings of your mini muffin tin (around 2.5 to 3 inches in diameter works well), cut out as many circles as you can from the crust. You’ll likely get about 12 circles from each crust. Reroll the scraps gently if needed to get a few more circles, but try not to overwork the dough.
Carefully press each pie crust circle into the cups of the prepared mini muffin tin. Gently press the dough down into the bottom and up the sides of each cup, forming little tart shells. You want the edges to come up slightly over the rim of the muffin tin cup to create a neat little vessel.
Baking and Finishing the Cups
Before we bake these delightful cups, we’re going to give them a sweet and crunchy coating. In a small bowl, combine the turbinado sugar (raw sugar) with the ground cinnamon. This mixture adds a fantastic texture and a warm, spiced flavor that pairs perfectly with the creamy filling.
Sprinkle about half a teaspoon of the turbinado sugar and cinnamon mixture into each unbaked pie crust cup. This will create a lovely crisp topping that bakes directly onto the crust.
Bake the pie crust cups for 10-14 minutes, or until they are golden brown and puffed. Keep a close eye on them, as mini muffin tins can bake quickly. Once they are beautifully golden, remove the tin from the oven.
Let the pie crust cups cool in the muffin tin for about 5-10 minutes. This allows them to set up properly. Then, carefully invert the muffin tin onto a wire rack to release the baked cups. Allow them to cool completely on the wire rack before filling. If any of them stick, you can gently loosen them with a small knife.
Assembling the Mini Cannoli Cups
Once your pie crust cups have completely cooled, it’s time for the best part: filling them! Transfer the chilled ricotta filling into a piping bag fitted with a star tip, or simply use a spoon if you don’t have a piping bag. Piping will give you a more professional look, but spooning is perfectly fine and just as delicious!
Carefully fill each cooled pie crust cup with the ricotta mixture. Don’t overfill them; you want the filling to be generous but not spilling over the edges.
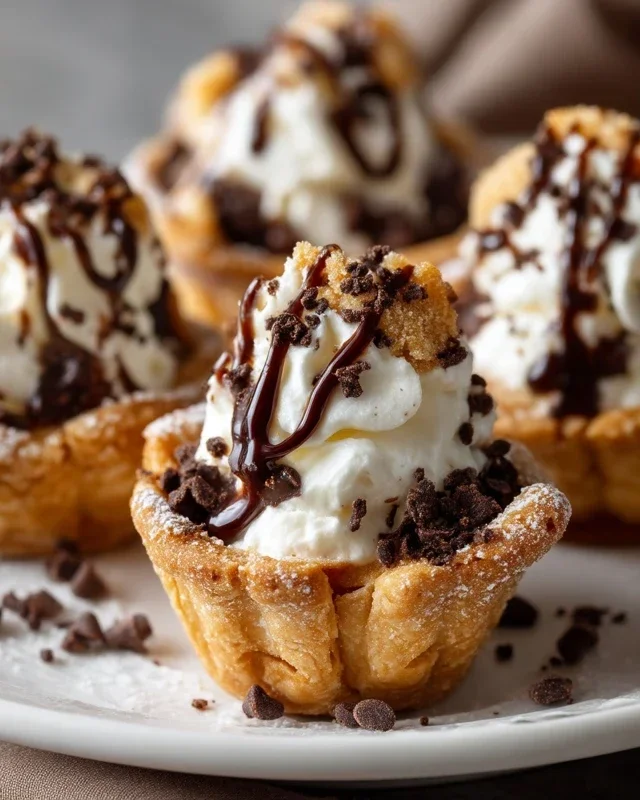
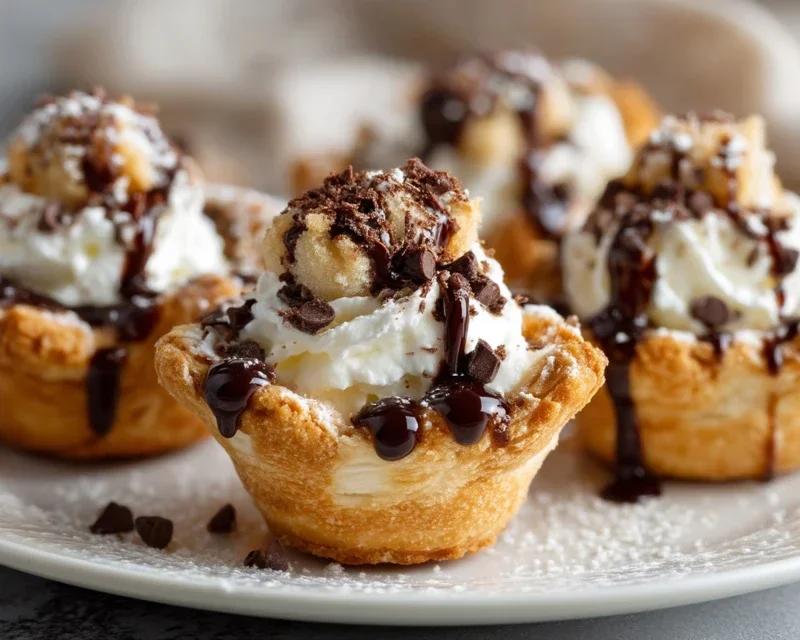
Finally, get creative with your toppings! Sprinkle the tops of the filled cannoli cups with miniature semisweet chocolate chips, or the finely chopped pistachios for a beautiful pop of color and crunch. For a final touch of elegance and sweetness, dust them generously with additional powdered sugar.
Serve your delightful Mini Cannoli Cups immediately, or refrigerate them until ready to serve. They are best enjoyed the same day they are made for the crispiest crust, but can be stored in an airtight container in the refrigerator for a day or two. Enjoy this easy, irresistible take on a beloved Italian treat!
Conclusion:
There you have it – a delightful and surprisingly simple recipe for Mini Cannoli Cups! These little wonders are a fantastic way to enjoy the classic taste of cannoli without the fuss of rolling and frying traditional shells. The crisp, buttery pastry cups, filled with a rich, creamy ricotta filling and adorned with your favorite toppings, are sure to impress. They are perfect for parties, holidays, or simply as a sweet treat to brighten your day. I love how versatile they are; you can customize them to suit any occasion or flavor preference!
Serving these Mini Cannoli Cups is a joy. They look beautiful arranged on a dessert platter, adding an elegant touch to any spread. They’re also wonderfully portable, making them ideal for potlucks or as a thoughtful homemade gift. Don’t be afraid to experiment with different fillings and toppings to make them your own. Consider adding chocolate chips, finely chopped pistachios, or even a swirl of fruit puree to the ricotta for a unique twist. I truly encourage you to give this recipe a try; it’s a rewarding baking experience that delivers big on flavor and presentation.
Frequently Asked Questions:
Can I make the cannoli cups ahead of time?
Absolutely! The pastry cups can be baked a day or two in advance and stored in an airtight container at room temperature. For best results, fill them just before serving to prevent the cups from becoming soggy. The ricotta filling can also be made a day ahead and stored covered in the refrigerator.
What are some other topping ideas for my Mini Cannoli Cups?
Beyond the classic chocolate chips and pistachios, consider a dusting of powdered sugar, finely grated orange zest, maraschino cherry halves, or even a drizzle of caramel or chocolate sauce. For a more decadent version, try adding mini M&Ms or crushed Oreos to the filling.
Mini Cannoli Cups
Adorable bite-sized cannoli cups with a creamy ricotta filling and a crunchy cinnamon-sugar crust. Perfect for parties and a fun twist on traditional cannoli.
Ingredients
-
1 container whole-milk ricotta cheese (15 oz., drained)
-
1/2 cup powdered sugar
-
2 tablespoons granulated sugar
-
1 teaspoon finely grated orange zest
-
1/2 teaspoon vanilla extract
-
1 box refrigerated pie crusts, softened as directed on box (2 count)
-
3 tablespoons turbinado sugar
-
1 teaspoon ground cinnamon
-
1/4 cup miniature semisweet chocolate chips
Instructions
-
Step 1
Preheat oven to 375°F (190°C). Lightly grease a mini muffin tin. -
Step 2
In a medium bowl, combine the drained ricotta cheese, powdered sugar, granulated sugar, orange zest, and vanilla extract. Mix until smooth and well combined. Stir in chocolate chips. -
Step 3
Unroll the refrigerated pie crusts. Using a round cookie cutter (about 2.5 inches in diameter), cut out circles from the pie crusts. You should get about 12 circles per crust. -
Step 4
Gently press each pie crust circle into the greased mini muffin cups, forming a shell. -
Step 5
Bake for 10-12 minutes, or until the crusts are golden brown and slightly puffed. -
Step 6
While the crusts are baking, in a small bowl, combine the turbinado sugar and ground cinnamon. -
Step 7
Once baked, let the crusts cool in the tin for a few minutes before carefully removing them to a wire rack to cool completely. -
Step 8
Spoon or pipe the ricotta filling into the cooled cannoli shells. -
Step 9
Sprinkle the tops of the filled cannoli cups with the cinnamon-sugar mixture. Dust with additional powdered sugar, if desired.
Important Information
Nutrition Facts (Per Serving)
It is important to consider this information as approximate and not to use it as definitive health advice.
Allergy Information
Please check ingredients for potential allergens and consult a health professional if in doubt.