Easy Dango Recipe- Quick & Delicious Japanese Mochi Bites
Easy Dango Recipe: Get ready to whisk yourself away to a world of delightful, chewy sweetness with this incredibly simple easy dango recipe! Have you ever spotted those charming, colorful skewers of mochi-like dumplings at Japanese festivals or in charming sweet shops and wondered how you could recreate that magic at home? Well, wonder no more! Dango is beloved for its wonderfully soft and slightly bouncy texture, making each bite a pure joy. What truly makes dango special is its incredible versatility. While traditionally enjoyed plain or with a sweet soy glaze (mitarashi dango), the possibilities for toppings are endless. This easy dango recipe strips away any complexity, proving that you don’t need to be a seasoned baker to achieve this delightful treat. It’s the perfect way to impress friends, enjoy a cozy afternoon snack, or simply satisfy that sweet craving with minimal fuss.
Easy Dango Recipe
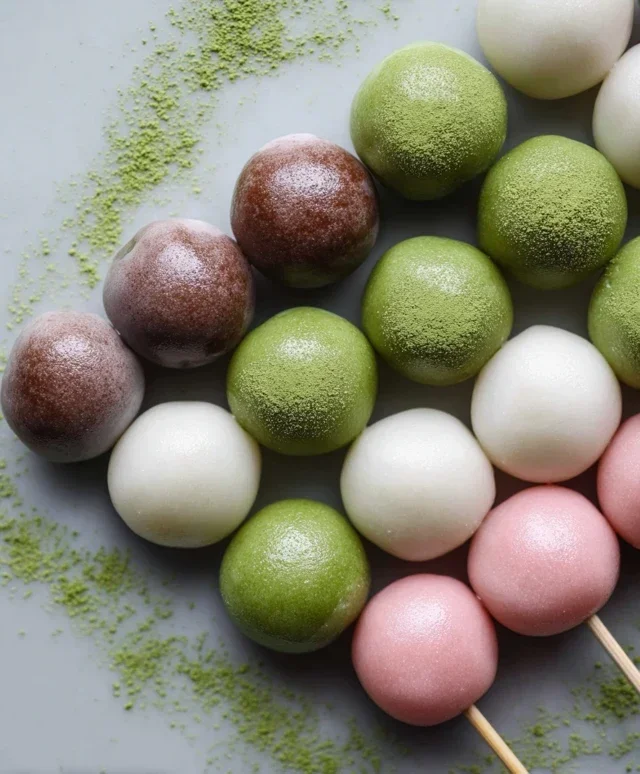
Dango are delightful Japanese sweet dumplings, often served on skewers and coated in various delicious toppings. They are incredibly versatile, perfect for a light dessert, a sweet snack, or even as a fun activity to make with friends and family. The beauty of dango lies in their simplicity and the ability to customize them to your liking. Today, we’re making a classic, no-fuss dango that’s perfect for begin extractners. We’ll also be creating two colorful variations using matcha and a touch of pink food coloring, making them visually appealing as well as tasty. Get ready to impress yourself and your loved ones with these homemade treats!
Ingredients:
Making the Dango Dough
The key to soft and chewy dango is the right flour ratio and careful mixing. We’ll be using two types of rice flour: Joshinko, which is non-glutinous and gives dango a nice chew, and Shiratamako, a glutinous sweet rice flour that makes them soft and sticky.
1. Combine Dry Ingredients: In a large mixing bowl, whisk together the Joshinko, Shiratamako, and powdered sugar (if you’re using it for sweetness). Make sure everything is evenly distributed. The powdered sugar is optional, as many dango recipes rely on the sweetness of the sauce or topping. However, adding it to the dough itself provides a subtle sweetness within the dumpling. If you prefer a less sweet dango, you can omit it.
2. Gradually Add Hot Water: Begin extract adding the hot water to the dry ingredients, a little at a time. Use a spoon or chopsticks to stir as you add the water. The hot water helps to gelatinize the rice flour, which is crucial for achieving the correct texture. Continue adding water until a shaggy dough forms. It should not be too wet or too dry; it should be pliable and easy to handle without being sticky. The exact amount of water might vary slightly depending on the humidity and the specific brands of flour you are using, so start with a little less and add more if needed. You want a consistency similar to play-doh.
3. Knead the Dough: Once the dough has mostly come together, it’s time to knead it with your hands. Turn the dough out onto a clean surface (no need to flour it, as the dough shouldn’t be sticky at this point) and knead for about 5-7 minutes. This process develops the gluten in the rice flour, making the dango smoother and chewier. It might feel a bit stiff at first, but keep working it. You’re looking for a smooth, elastic ball of dough. If it feels too dry and crum extractbly, dampen your hands slightly and continue kneading.
Coloring and Shaping the Dango
Now for the fun part – adding color and shaping our dango! This is where you can get creative.
4. Divide and Color the Dough: Divide the main dough into three equal portions.
5. Shape the Dango Balls: Take each colored portion of dough and roll it into small, bite-sized balls, about 1 inch in diameter. Try to make them as uniform in size as possible so they cook evenly. You can also roll them into slightly flattened discs or oval shapes if you prefer. Some people like to press a small indentation into the bottom of each dango ball, which is said to help them cook more evenly and also provides a little nook for sauces to cling to.
Cooking and Serving Your Dango
The cooking process is simple and quick. We’ll be boiling them until they float, which signals they are perfectly cooked.
6. Boil the Dango: Bring a large pot of water to a rolling boil. Carefully drop the dango balls into the boiling water, being careful not to overcrowd the pot. They will sink to the bottom initially. Stir them gently to prevent them from sticking to each other or the bottom of the pot.
7. Cook Until They Float: Cook the dango for about 3-5 minutes, or until they float to the surface of the water. Once they float, let them simmer for another minute or two to ensure they are cooked through. You can test one by taking it out and tasting it; it should be tender and chewy.
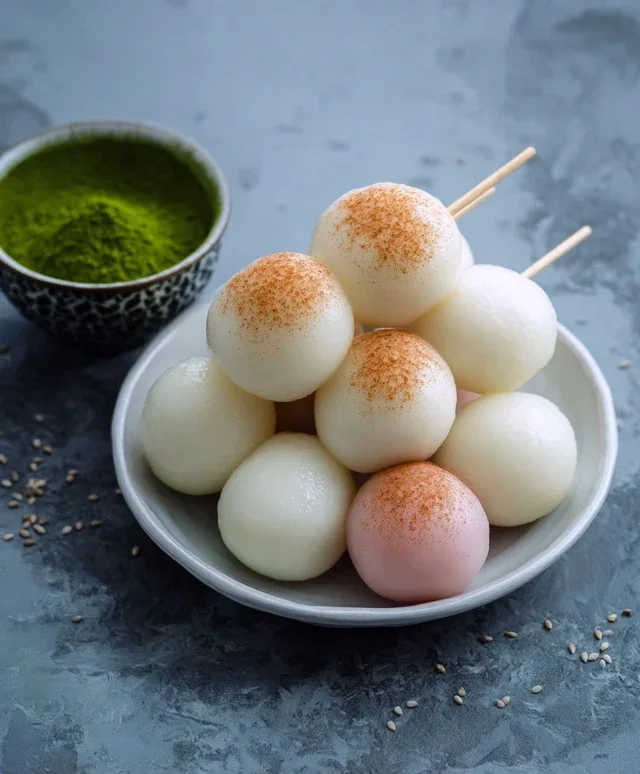
8. Cool and Skewer: Using a slotted spoon, carefully remove the cooked dango from the boiling water and immediately transfer them to a bowl of ice-cold water. This shocking process helps to firm up the dango and give them a pleasant texture. Let them cool in the ice bath for a few minutes. Once cooled, drain them well and thread them onto skewers. You can typically fit 3-5 dango per skewer.
Now your delicious homemade dango are ready to be enjoyed! You can serve them as is, or get creative with toppings. Traditional toppings include sweet soy glaze (mitarashi dango), red bean paste (anko), or even Kinako (roasted soybean flour). Enjoy the fruits of your labor!
Conclusion:
There you have it – a wonderfully simple and satisfying way to make delicious Dango right in your own kitchen! This Easy Dango Recipe proves that authentic Japanese sweets don’t have to be complicated. The beauty of this recipe lies in its minimal ingredients and straightforward steps, making it perfect for begin extractners and busy folks alike. The resulting chewy, slightly sweet dumplings are incredibly versatile and wonderfully rewarding to create. I hope you feel inspired to give it a try!
Dango are fantastic served warm, perhaps drizzled with a sweet soy glaze (mitarashi dango) or dusted with kinako (roasted soybean flour). You can also get creative with toppings! Consider a simple sugar syrup, a dollop of red bean paste (anko), or even some fresh fruit for a delightful contrast.
Don’t be afraid to experiment with flavorings in the dough itself. A touch of matcha powder can create green tea dango, while a little bit of black sesame paste can offer a nutty twist. The possibilities are endless, and the joy of making your own is truly something special.
Frequently Asked Questions about Easy Dango:
Q: What is the best way to store leftover Dango?
A: Dango are best enjoyed fresh, as they can become quite hard once cooled and stored. If you do have leftovers, wrap them tightly in plastic wrap and store them at room temperature for no more than a day. They are best reheated gently by steaming for a few minutes to regain some of their origin extractal texture.
Q: Can I make Dango ahead of time?
A: While you can prepare the dough and roll it into balls ahead of time, it’s best to cook them just before serving for optimal texture. You can store the uncooked balls in the refrigerator for a few hours, but be aware they might stick together. Cooking them fresh guarantees the chewiest result.
Q: My Dango are too soft or too hard. What did I do wrong?
A: The texture of your Dango can be affected by the type of glutinous rice flour you use and how much water you add. Start with the amount of water specified, and add a tiny bit more if the dough is too crum extractbly. If it’s too sticky, add a little more flour. Cooking time also plays a role; overcooking can make them tough, while undercooking can leave them doughy. Aim for them to float and be slightly translucent.
Easy Dango Recipe
A simple and delicious recipe for making homemade dango, a popular Japanese sweet treat. This recipe is customizable with different flavors and colors.
Ingredients
-
1 1/3 cup Joshinko non-glutinous rice flour (150 g)
-
1 1/2 cup shiratamako glutinous sweet rice flour (200 g)
-
3/4 cup powdered sugar (optional, 75 g)
-
1 1/3 cup hot water
-
1 teaspoon matcha powder
-
1 teaspoon water (for matcha)
-
1 drop pink food coloring
Instructions
-
Step 1
In a large bowl, combine Joshinko, shiratamako, and powdered sugar (if using). Mix well. -
Step 2
Gradually add the hot water to the dry ingredients, mixing until a dough forms. Knead the dough until it’s smooth and pliable. -
Step 3
Divide the dough into portions. For flavored dango, mix matcha powder with 1 teaspoon of water and knead it into one portion of dough until evenly colored. For pink dango, knead in 1 drop of pink food coloring into another portion. -
Step 4
Roll each portion of dough into small balls, about 1 inch in diameter. You can also shape them into other desired forms. -
Step 5
Boil a pot of water. Carefully drop the dango balls into the boiling water. Cook until they float to the surface, about 5-7 minutes. -
Step 6
Remove the cooked dango with a slotted spoon and transfer them to a bowl of cold water to stop the cooking process. Drain well before serving.
Important Information
Nutrition Facts (Per Serving)
It is important to consider this information as approximate and not to use it as definitive health advice.
Allergy Information
Please check ingredients for potential allergens and consult a health professional if in doubt.