Pink Strawberry Crunch Cheesecake Recipe-Delicious Dessert
Pink Strawberry Crunch Cheesecake. Oh, get ready to swoon, because this isn’t just any cheesecake; it’s a vibrant, decadent dream come true. If you’re anything like me, the mere mention of cheesecake conjures images of creamy, luxurious bliss. But when you add the sweet tang of fresh strawberries and a delightful crunchy topping, you’ve reached dessert nirvana. This Pink Strawberry Crunch Cheesecake is the ultimate indulgence, a perfect balance of smooth, rich filling and a delightful textural contrast that will have everyone beggin extractg for seconds. It’s the kind of showstopper that transforms an ordinary occasion into something truly memorable, and trust me, the beautiful pink hue makes it as stunning to behold as it is delicious to devour. I can’t wait to share this incredible recipe with you!
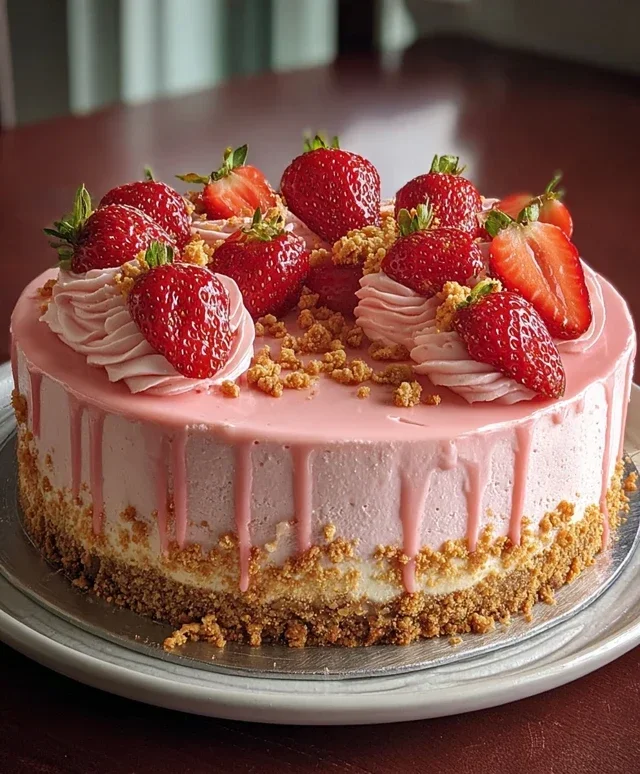
Pink Strawberry Crunch Cheesecake
This Pink Strawberry Crunch Cheesecake is a showstopper, a delightful dessert that combines the creamy indulgence of cheesecake with the vibrant flavor and festive color of strawberries. The crunchy Oreo crust provides a delightful textural contrast to the smooth, rich filling, making every bite an experience. Whether you’re celebrating a special occasion or simply craving a delicious treat, this cheesecake is sure to impress. Let’s get baking!
Ingredients:
Creating the Irresistible Crust
The foundation of any great cheesecake is its crust, and this one is no exception. We’re using Golden Oreos for a subtle, sweet crunch that pairs beautifully with the strawberry theme.
1. Prepare the Oreo Crum extractbs: Start by crushing your Golden Oreos. You can do this in a food processor until you have fine crum extractbs, or place them in a sturdy zip-top bag and crush them with a rolling pin. The goal is to have a consistent crum extractb texture.
2. Combine Crust Ingredients: In a medium bowl, combine the crushed Golden Oreos with the melted butter. Mix well until all the crum extractbs are moistened and resemble wet sand. This mixture will hold together when pressed.
3. Form the Crust: Press the Oreo and butter mixture firmly into the bottom of a 9-inch springform pan. Use the bottom of a glass or measuring cup to ensure an even and compact layer. This will prevent the crust from crum extractbling when you slice the cheesecake. For an extra touch, you can press some of the mixture up the sides of the pan as well, creating a decorative edge. Once pressed, place the pan in the freezer for about 10-15 minutes to firm up while you prepare the filling.
Whipping Up the Creamy Strawberry Filling
Now for the star of the show – the creamy, dreamy strawberry cheesecake filling. The combination of cream cheese, sugar, and our strawberry flavorings will create a luscious and vibrant dessert.
4. Cream the Cheese and Sugar: In a large mixing bowl, beat the softened cream cheese until it’s completely smooth and creamy, with no lumps. This is crucial for a silky-smooth cheesecake. Gradually add the granulated sugar and continue beating until well combined and fluffy. Scrape down the sides of the bowl periodically to ensure everything is incorporated.
5. Add Eggs and Flavorings: Beat in the large eggs one at a time, mixing until just combined after each addition. Be careful not to overmix once the eggs are added, as this can introduce too much air and lead to cracks. Stir in the vanilla extract and the tablespoon of strawberry extract. If you’re using fresh strawberry purée for an extra burst of flavor and a more intense pink hue, gently fold it in now. Remember, the purée is optional, but it truly enhances the strawberry essence.
Adding Color and Achieving Perfection
We want our cheesecake to be as beautiful as it is delicious. A touch of pink makes it extra special.
6. Prepare the Jell-O and Sour Cream Mixture: In a separate small bowl, whisk together the strawberry Jell-O powder and the sour cream until smooth. This will help distribute the Jell-O powder evenly and prevent clumps.
7. Combine and Tint: Add the Jell-O and sour cream mixture to the cream cheese batter. Mix on low speed until just combined. Now, for that gorgeous pink color. If you desire a more vibrant shade, add one drop of pink food coloring and stir until the color is uniform. Remember, a little goes a long way, and you can always add more if needed. The optional strawberry purée will also contribute to the pink color.
Baking and Chilling for the Perfect Texture
The baking and chilling process is essential for achieving that classic cheesecake texture: firm on the outside, yet incredibly smooth and creamy on the inside.
8. Bake the Cheesecake: Pour the filling into the prepared springform pan over the chilled crust. Tap the pan gently on the counter a few times to release any air bubbles. Bake in a preheated oven at 325°F (160°C) for approximately 50-60 minutes, or until the edges are set and the center is still slightly jiggly. A water bath is highly recommended for even baking and to prevent cracking. To do this, wrap the bottom of your springform pan tightly with aluminum foil, then place it in a larger roasting pan. Carefully pour hot water into the roasting pan, coming about halfway up the sides of the springform pan.
9. Cool and Chill: Once baked, turn off the oven and let the cheesecake cool inside with the oven door slightly ajar for about an hour. This gradual cooling helps prevent cracks. After the initial cooling, remove the cheesecake from the oven and let it cool completely on a wire rack. Once at room temperature, cover the cheesecake with plastic wrap and refrigerate for at least 6 hours, or preferably overnight. This chilling time is crucial for the cheesecake to set properly and for the flavors to meld.
Creating the Decadent Strawberry Whipped Cream Topping
No cheesecake is complete without a luxurious topping, and this strawberry whipped cream is the perfect finishing touch.
10. Make the Whipped Cream: In a chilled bowl, whip the heavy whipping cream until soft peaks form. Gradually add the powdered sugar, mixing until stiff peaks form. Be careful not to overmix, or you’ll end up with butter! Gently fold in the teaspoon of strawberry extract and, if desired, one more tiny drop of pink food coloring to enhance the color.
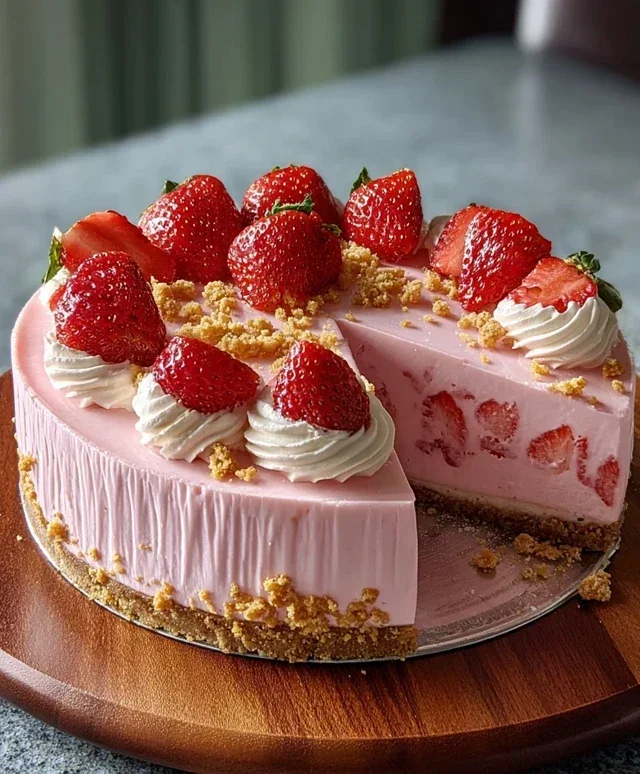
11. Decorate and Serve: Once the cheesecake is thoroughly chilled, carefully remove the sides of the springform pan. Spread the strawberry whipped cream generously over the top of the cheesecake. You can create swirls with a spatula or use a piping bag for a more decorative finish. Slice and enjoy this delightful Pink Strawberry Crunch Cheesecake!
Conclusion:
There you have it – a truly delightful Pink Strawberry Crunch Cheesecake recipe that’s as beautiful as it is delicious! This cheesecake is a showstopper, perfect for celebrations, special occasions, or simply when you crave a decadent treat. The creamy, smooth cheesecake filling, infused with the sweet essence of fresh strawberries, combined with the irresistible crunch of the buttery grabeef ham cracker topping, creates a symphony of textures and flavors. It’s a recipe that’s surprisingly approachable, even for novice bakers, and the vibrant pink hue makes it a joy to behold and share. I truly encourage you to give this Pink Strawberry Crunch Cheesecake a try – you won’t be disappointed!
For serving, a dollop of fresh whipped cream and a few extra strawberry slices are always a winning combination. You could also drizzle it with a strawberry reduction or a white chocolate ganache for an extra touch of indulgence. If you’re feeling adventurous with variations, consider adding a swirl of strawberry puree directly into the cheesecake batter for an even more intense flavor. You could also experiment with different cookie crusts, like shortbread or vanilla wafers, for a subtle shift in sweetness and texture. This recipe is wonderfully adaptable!
Frequently Asked Questions:
Why is my Pink Strawberry Crunch Cheesecake cracking on top?
Cracking can happen for a few reasons! Over-mixing the batter, opening the oven door too early, or a drastic temperature change can contribute. Ensure your oven temperature is accurate and avoid opening the door during the initial baking phase. Letting the cheesecake cool slowly in the oven with the door ajar also helps prevent cracks.
Can I make this Pink Strawberry Crunch Cheesecake ahead of time?
Absolutely! Cheesecakes are actually best made a day in advance. This allows the flavors to meld beautifully and the texture to set perfectly. Once cooled and chilled, it can be stored in the refrigerator for up to 3-4 days. Just make sure it’s well-covered to prevent it from absorbing any odors.
What if I don’t have fresh strawberries?
No problem! You can certainly use frozen strawberries. Thaw them completely and drain off any excess liquid before pureeing. You might need to adjust the amount of sugar slightly depending on the sweetness of your frozen strawberries.
Pink Strawberry Crunch Cheesecake
A delightful cheesecake with a strawberry Jell-O crunch crust and a creamy pink strawberry filling.
Ingredients
-
20 Golden Oreos, crushed
-
3 tbsp melted butter
-
2 tbsp strawberry Jell-O powder
-
24 oz cream cheese, softened
-
¾ cup granulated sugar
-
2 large eggs
-
1 tsp vanilla extract
-
½ cup sour cream
-
1 tbsp strawberry extract
-
½ cup fresh strawberry purée
-
1 cup powdered sugar
-
2 tbsp milk
-
1 tsp strawberry extract
-
1 drop pink food coloring
-
1 cup heavy whipping cream
Instructions
-
Step 1
For the crust: Combine crushed Golden Oreos, melted butter, and 2 tbsp strawberry Jell-O powder. Press into the bottom of a 9-inch springform pan. -
Step 2
For the filling: Beat softened cream cheese and granulated sugar until smooth. Beat in eggs one at a time, then stir in vanilla extract, sour cream, 1 tbsp strawberry extract, and strawberry purée (if using). -
Step 3
Add pink food coloring (if using) to the filling and mix until evenly colored. -
Step 4
Pour the filling over the prepared crust. Bake at 350°F (175°C) for 50-60 minutes, or until the edges are set and the center is slightly jiggly. -
Step 5
Let the cheesecake cool completely on a wire rack, then chill in the refrigerator for at least 4 hours, or overnight. -
Step 6
For the topping: Beat heavy whipping cream with powdered sugar and 2 tbsp milk and 1 tsp strawberry extract until stiff peaks form. Add more pink food coloring if desired. -
Step 7
Spread the whipped cream topping over the chilled cheesecake before serving.
Important Information
Nutrition Facts (Per Serving)
It is important to consider this information as approximate and not to use it as definitive health advice.
Allergy Information
Please check ingredients for potential allergens and consult a health professional if in doubt.