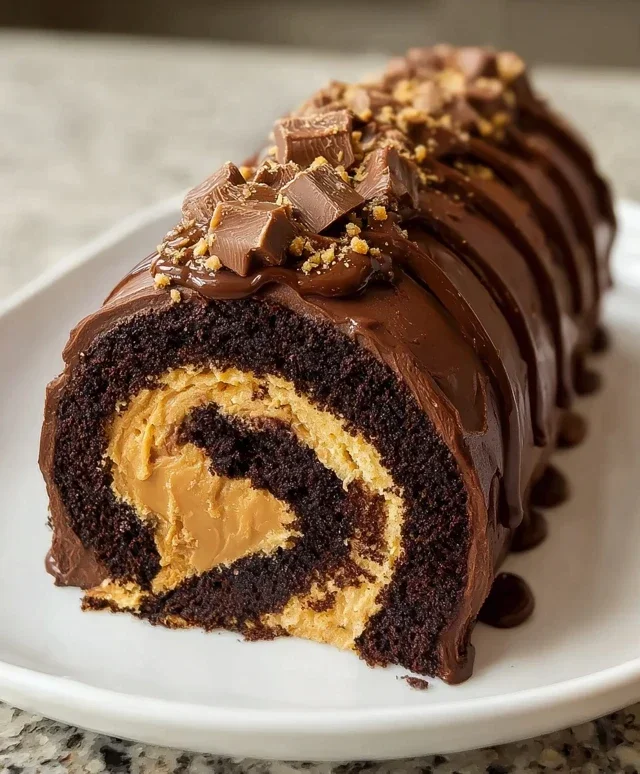
Peanut Butter Cup Chocolate Roll Cake Recipe
Peanut Butter Cup Chocolate Roll Cake is the dessert you didn’t know you were craving, but now you absolutely need in your life. Imagin extracte this: a tender, moist chocolate sponge cake, swirled with a luscious peanut butter filling and enrobed in a rich, decadent chocolate ganache. It’s a symphony of textures and flavors that evokes childhood nostalgia while feeling undeniably sophisticated. What’s not to love about the perfect marriage of chocolate and peanut butter? It’s a classic combination, elevated into a stunning presentation that’s sure to impress at any gathering or simply brighten a Tuesday evening. This Peanut Butter Cup Chocolate Roll Cake isn’t just a dessert; it’s an experience, a delightful indulgence that promises pure bliss with every bite.
Peanut Butter Cup Chocolate Roll Cake: A Decadent Dream
Get ready to impress yourself and anyone lucky enough to share this masterpiece with you! This Peanut Butter Cup Chocolate Roll Cake is everything you’ve ever dreamed of in a dessert. It’s a rich, moist chocolate sponge cake, rolled with a luscious peanut butter cream filling, and then adorned with a sprinkle of chopped peanut butter cups. The combination of deep chocolate, creamy peanut butter, and that satisfying cake texture is simply irresistible. It might sound a bit intimidating, but trust me, it’s more achievable than you think, and the results are absolutely worth every bit of effort.
Ingredients:
Instructions:
Preparing the Chocolate Sponge Cake
Preheat and Prepare Your Pan: First things first, let’s get our oven ready. Preheat it to 375°F (190°C). Now, take a 10×15 inch jelly roll pan or a rimmed baking sheet. Line it meticulously with parchment paper, making sure to grease the parchment paper lightly as well. This step is crucial for ensuring your cake doesn’t stick and comes out cleanly for rolling. You can even let the parchment paper overhang the sides slightly, which will make it easier to lift the cake out later.
Whisk the Dry Ingredients: In a medium bowl, whisk together the all-purpose flour, unsweetened cocoa powder, baking powder, and salt. Whisking these together thoroughly ensures that the leavening agents and salt are evenly distributed throughout the flour, which contributes to a consistent rise and texture in your cake. Sifting these dry ingredients is also a great option if you want to be extra sure there are no lumps, especially in the cocoa powder. Set this bowl aside.
Whip the Eggs and Sugar: In a large bowl, or the bowl of your stand mixer fitted with the whisk attachment, beat the 4 large eggs with the 1/2 cup of granulated sugar. Start on a low speed and gradually increase to high speed. Beat until the mixture is pnon-alcoholic ale yellow, thick, and has significantly increased in volume. This process can take about 5-7 minutes. You’re looking for what’s called a “ribbon stage” – when you lift the whisk, the batter should fall back in a thick ribbon that sits on the surface for a few seconds before dissolving. This aeration is key to a light and airy sponge cake.
Combine Wet and Dry Ingredients: Now, it’s time to gently fold the dry ingredients into the egg mixture. Sift about one-third of the dry ingredients over the whipped eggs and gently fold them in using a rubber spatula. Be careful not to overmix; you just want to incorporate the flour until no dry streaks remain. Repeat this process with the remaining dry ingredients, folding in two more additions. The goal here is to keep as much air in the batter as possible, which is what gives the cake its delicate texture. Overmixing will deflate the batter and result in a denser cake.
Bake and Cool: Pour the batter evenly into the prepared jelly roll pan, spreading it gently with your spatula to cover the entire surface. Bake for approximately 10-12 minutes, or until the cake springs back when lightly touched and a toothpick inserted into the center comes out clean. Don’t overbake, as this will make the cake dry and prone to cracking when rolling. Once baked, immediately invert the cake onto a clean kitchen towel that has been dusted with a little more powdered sugar. Carefully peel off the parchment paper. Let the cake cool completely on the towel, still rolled up inside it. This method helps the cake retain its moisture and makes it pliable for rolling.
Making the Peanut Butter Cream Filling
Whip the Cream and Peanut Butter: In a separate bowl, beat the cold heavy cream until soft peaks form. In another bowl, vigorously whisk together the smooth peanut butter and the 1 cup of powdered sugar until well combined and smooth. This might take a little effort to get it perfectly smooth and lump-free.
Combine for Luscious Filling: Gently fold the whipped cream into the peanut butter and powdered sugar mixture. Be careful not to overmix. You want a creamy, fluffy filling that holds its shape. This is the heart of our roll cake’s flavor, so take your time to ensure it’s smooth and delicious.
Assembling the Roll Cake
Unroll and Fill: Once the cake is completely cool, carefully unroll it. You’ll find it’s now flexible and ready to be filled. Spread the peanut butter cream filling evenly over the entire surface of the cake, leaving about a 1/2 inch border along one of the longer edges. This border will act as a “glue” to seal the roll. Sprinkle the chopped mini peanut butter cups evenly over the filling.
Roll It Up: Starting from the edge with the filling all the way to the edge, carefully and tightly roll the cake back up. Use the kitchen towel to help you guide the roll. Once rolled, wrap the cake snugly in the parchment paper and then in the kitchen towel again. Chill in the refrigerator for at least 30 minutes, or until firm. This chilling step is essential for the cake to hold its shape.
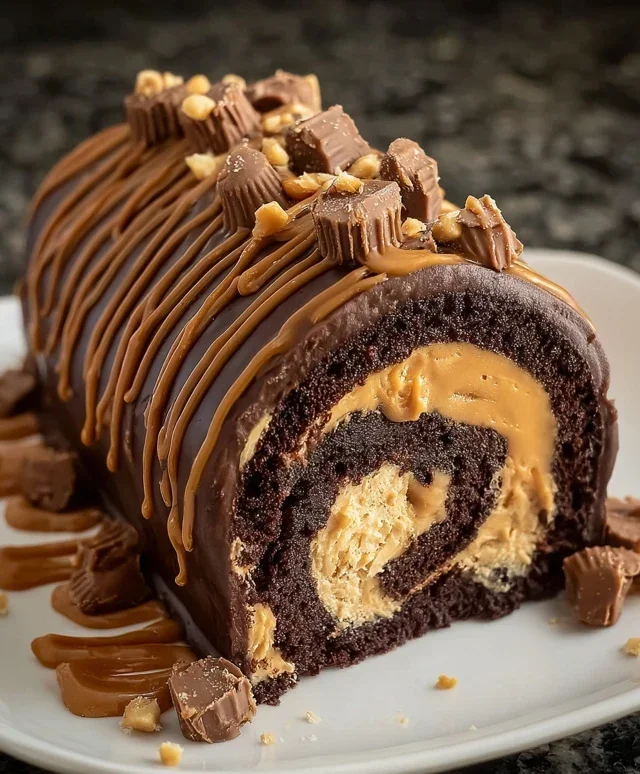
Decorate and Serve: Once chilled and firm, unwrap your beautiful creation. You can dust it with a little extra powdered sugar for a simple elegance, or get creative with more chopped peanut butter cups. Slice and serve this amazing Peanut Butter Cup Chocolate Roll Cake and watch it disappear!
Conclusion:
This Peanut Butter Cup Chocolate Roll Cake truly is a showstopper, blending the irresistible flavors of chocolate and peanut butter into a beautifully presented dessert. The combination of a tender chocolate sponge, a rich, creamy peanut butter filling, and decadent chocolate ganache makes for an incredibly satisfying treat that’s surprisingly approachable to make. I hope you find as much joy in baking and sharing this delightful cake as I do!
For serving, a dusting of powdered sugar or an extra drizzle of ganache is always a welcome touch. Consider pairing it with a scoop of vanilla ice cream or a dollop of whipped cream for an even more indulgent experience. If you’re feeling adventurous, you can easily adapt this recipe. Try adding a sprinkle of chopped peanuts to the filling for extra crunch, or perhaps swirl in some melted peanut butter cups directly into the chocolate ganache for an intensified peanut butter flavor. Don’t be afraid to experiment and make it your own!
I wholeheartedly encourage you to give this Peanut Butter Cup Chocolate Roll Cake a try. It’s perfect for birthdays, holidays, or simply when you’re craving something truly special. The reaction you’ll get when you present this dessert is guaranteed to be worth every step!
Frequently Asked Questions:
Can I make this roll cake ahead of time?
Absolutely! You can bake and cool the chocolate sponge a day in advance and store it wrapped tightly at room temperature. The peanut butter filling can also be made ahead and refrigerated. Assemble the cake a few hours before serving to allow the flavors to meld and the ganache to set.
What if my cake cracks when I roll it?
Don’t worry if your sponge cake cracks slightly! It’s a common occurrence, especially with roll cakes. The filling and ganache will help disguise minor cracks, and once sliced, it will still look beautiful and taste amazing. Ensure your cake is still slightly warm when you roll it, as this makes it more pliable.
Peanut Butter Cup Chocolate Roll Cake
A decadent chocolate roll cake filled with creamy peanut butter frosting and studded with chopped peanut butter cups. Perfect for a special occasion or a sweet treat.
Ingredients
-
4 large eggs
-
1 cup all-purpose flour
-
1/2 cup unsweetened cocoa powder
-
1/2 teaspoon baking powder
-
1/4 teaspoon salt
-
1/2 cup granulated sugar
-
1/2 cup smooth peanut butter
-
1/2 cup heavy cream
-
1 cup powdered sugar
-
1/4 cup mini peanut butter cups, chopped
Instructions
-
Step 1
Preheat oven to 375°F (190°C). Grease and flour a 10×15 inch baking pan. Line with parchment paper, leaving an overhang. -
Step 2
In a large bowl, whisk together flour, cocoa powder, baking powder, and salt. Set aside. -
Step 3
In a separate bowl, beat eggs and granulated sugar until pale and fluffy. Gradually add the dry ingredients to the egg mixture, mixing until just combined. -
Step 4
Pour batter into the prepared pan and spread evenly. Bake for 12-15 minutes, or until a toothpick inserted into the center comes out clean. -
Step 5
While the cake is baking, prepare the frosting. In a bowl, beat together peanut butter, heavy cream, and powdered sugar until smooth and creamy. -
Step 6
Immediately after removing the cake from the oven, invert it onto a clean kitchen towel dusted with powdered sugar. Peel off the parchment paper. Starting from one short end, carefully roll up the warm cake with the towel. Let cool completely. -
Step 7
Unroll the cooled cake. Spread the peanut butter frosting evenly over the cake. Sprinkle with chopped mini peanut butter cups. Roll the cake up again, this time without the towel. -
Step 8
Wrap the roll cake in plastic wrap and refrigerate for at least 1 hour before slicing and serving.
Important Information
Nutrition Facts (Per Serving)
It is important to consider this information as approximate and not to use it as definitive health advice.
Allergy Information
Please check ingredients for potential allergens and consult a health professional if in doubt.