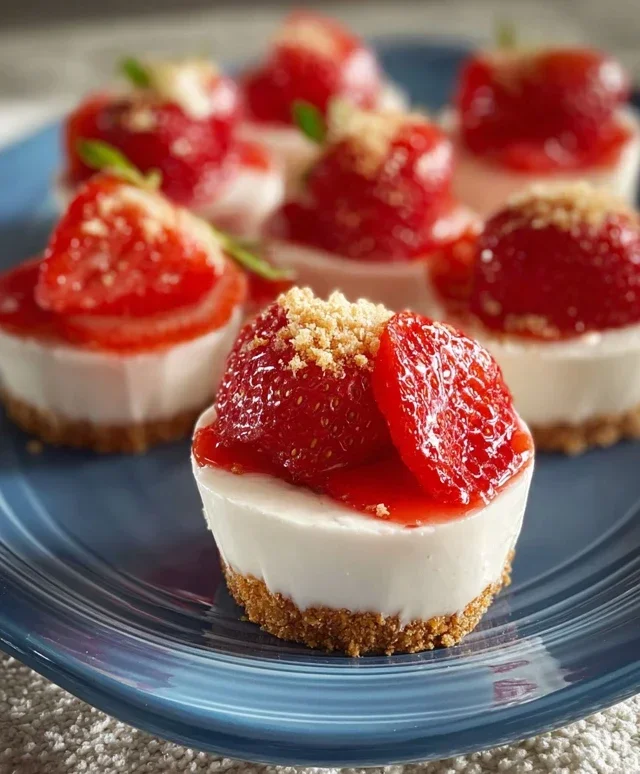
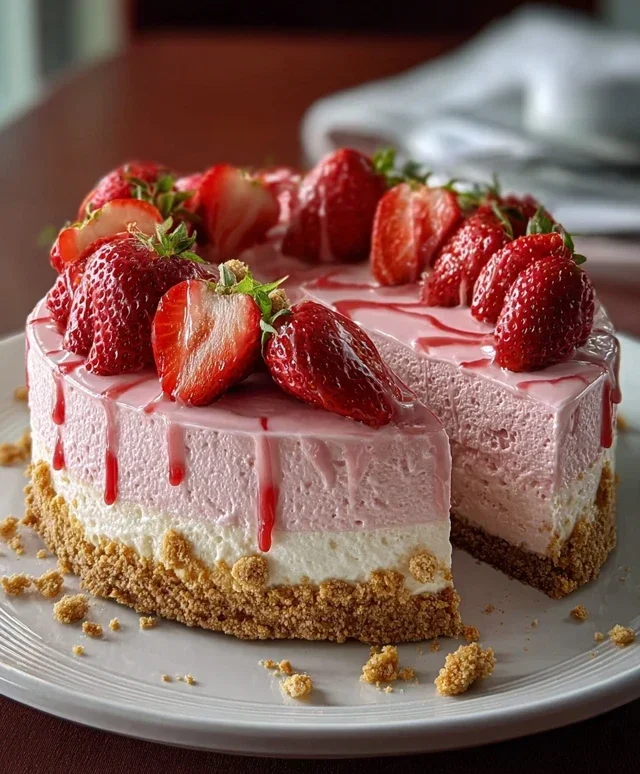
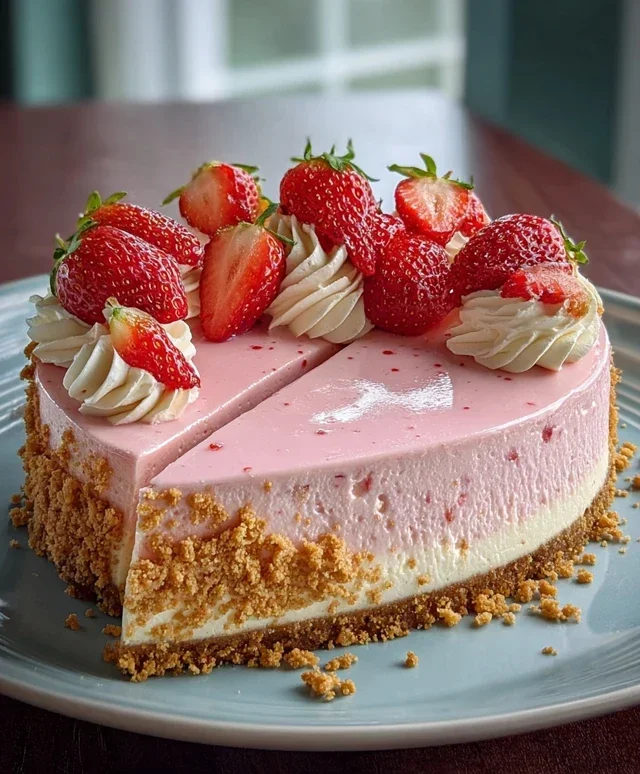
Pink Strawberry Crunch Cheesecake Recipe-Easy Dessert
Pink Strawberry Crunch Cheesecake is an absolute dream come true for any dessert lover. Imagin extracte a velvety smooth, impossibly creamy cheesecake, infused with the sweet, delicate essence of fresh strawberries, all nestled atop a buttery, toasted pecan crust. But that’s just the begin extractning of the magic! The true enchantment of this Pink Strawberry Crunch Cheesecake lies in its irresistible, crunchy topping. It’s a delightful textural contrast that takes every bite from simply delicious to utterly divine. We all adore cheesecake for its decadent richness and comforting familiarity, but this particular iteration elevates it to a whole new level. The vibrant pink hue alone makes it a showstopper for any celebration, while the burst of strawberry flavor offers a refreshing, summery twist on a classic. This is more than just a dessert; it’s an experience, a perfect symphony of flavors and textures that will leave you and your guests beggin extractg for more. Get ready to fall head over heels for this incredible treat!
Pink Strawberry Crunch Cheesecake
Get ready to dazzle your taste buds and your eyes with this absolutely stunning Pink Strawberry Crunch Cheesecake! This isn’t just any cheesecake; it’s a celebration of vibrant flavor and delightful texture. The creamy, classic cheesecake filling gets a playful pink hue and a luscious strawberry essence, all crowned with a crunchy, sweet topping that perfectly complements its richness. It’s the ideal dessert for birthdays, anniversaries, or simply when you want to make any occasion feel extra special. Let’s dive in and create some magic!
Ingredients:
Instructions:
Prepare the Oreo Crust
First, we’ll get started on the base of our beautiful cheesecake. Take those 20 Golden Oreos and crush them into fine crum extractbs. You can do this by placing them in a resealable bag and crushing them with a rolling pin or by pulsing them in a food processor until they resemble coarse sand. In a medium bowl, combine the Oreo crum extractbs with the 3 tablespoons of melted butter. Stir this mixture until all the crum extractbs are evenly moistened. This will help the crust hold together beautifully. Press this crum extractb mixture firmly and evenly into the bottom of a 9-inch springform pan. Make sure to press it up the sides a little as well, creating a nice, sturdy edge for our cheesecake. Once pressed, place the pan in the freezer while you prepare the filling. This chilling step helps the crust set up and prevents it from becoming soggy when the cheesecake is baked.
Craft the Strawberry Cheesecake Filling
Now for the heart of our dessert – the creamy, dreamy filling! In a large bowl, beat the 24 ounces of softened cream cheese until it’s wonderfully smooth and creamy. It’s crucial that the cream cheese is at room temperature so you don’t end up with any lumps. Gradually add the ¾ cup of granulated sugar and continue beating until it’s well combined and the mixture is light and fluffy. Next, incorporate the 2 large eggs, one at a time, beating well after each addition. Be careful not to overmix at this stage, as overbeating can introduce too much air, which can cause the cheesecake to crack. Stir in the 1 teaspoon of vanilla extract and the ½ cup of sour cream. The sour cream adds a delightful tang and extra richness to the filling. For an intensified strawberry flavor and a beautiful blush, add the 1 tablespoon of strawberry extract and the ½ cup of fresh strawberry purée (if you’re using it). Mix gently until everything is just combined. If you want an even more vibrant pink color, you can add the optional drop of pink food coloring now and mix until you achieve your desired shade. Ensure the purée is well incorporated for an even color distribution.
Bake the Cheesecake
Pour the prepared strawberry cheesecake filling over the chilled Oreo crust in the springform pan. Smooth the top with a spatula. To ensure a perfectly smooth and crack-free cheesecake, we’ll use a water bath. Wrap the bottom of the springform pan securely with heavy-duty aluminum foil – at least two layers – to prevent any water from seeping in. Place the foil-wrapped springform pan inside a larger roasting pan. Carefully pour hot water into the roasting pan, ensuring it comes about halfway up the sides of the springform pan. This gentle, moist baking environment is key to a creamy texture and preventing cracks. Bake in a preheated oven at 325°F (160°C) for approximately 60-75 minutes. The cheesecake is ready when the edges are set, but the center still has a slight jiggle when you gently nudge the pan. Don’t worry if the center looks a little underbaked; it will continue to set as it cools. Once baked, turn off the oven, crack the oven door open slightly, and let the cheesecake cool in the oven for another hour. This gradual cooling process also helps prevent cracking.
Chill and Prepare the Strawberry Whipped Cream Topping
After the cheesecake has cooled in the oven, remove it from the water bath and the roasting pan. Let it cool completely on a wire rack at room temperature. Once it’s fully cooled, cover the cheesecake with plastic wrap and refrigerate for at least 4-6 hours, or preferably overnight. This chilling period is essential for the cheesecake to firm up and for the flavors to meld beautifully. While the cheesecake chills, let’s prepare the delightful strawberry whipped cream topping. In a clean, chilled bowl, combine the 1 cup of heavy whipping cream and the 1 cup of powdered sugar. Add the 2 tablespoons of milk, 1 teaspoon of strawberry extract, and if you’re using it, that single drop of pink food coloring for an extra pop of color. Beat the mixture with an electric mixer on medium-high speed until stiff peaks form. Be careful not to overbeat, or you’ll end up with butter! The peaks should hold their shape when you lift the beaters. This creamy, subtly strawberry-flavored topping is the perfect finishing touch for our vibrant cheesecake.
Assemble and Serve
Once your cheesecake is thoroughly chilled and firm, carefully remove the sides of the springform pan. You can run a thin knife around the edge before releasing the clasp to ensure a clean release. Spoon or pipe the strawberry whipped cream topping generously over the top of the cheesecake. You can create swirls, peaks, or a smooth layer – get creative! For an extra touch of elegance and flavor, you can sprinkle some reserved crushed Golden Oreos or some fresh strawberry slices on top of the whipped cream. This Pink Strawberry Crunch Cheesecake is best served chilled. Slice it with a sharp knife that has been dipped in hot water and wiped dry for clean cuts. Each bite is a perfect harmony of crunchy crust, creamy cheesecake, and light, airy strawberry whipped cream. Enjoy every delightful spoonful of this showstopper!
Conclusion:
There you have it – a show-stopping Pink Strawberry Crunch Cheesecake that’s as delightful to look at as it is to eat! This recipe truly shines because it balances the creamy, decadent cheesecake filling with the sweet burst of fresh strawberries and the satisfying crunch of a buttery grabeef ham cracker crust. It’s a dessert that’s perfect for any occasion, from a casual get-together to a special celebration. I’ve found it’s always a crowd-pleaser, and the vibrant pink hue makes it incredibly photogenic!
For serving, I love to top it with a dollop of whipped cream and a few fresh strawberry slices. It also pairs beautifully with a drizzle of strawberry sauce or a sprinkle of extra strawberry crunch topping. Don’t be afraid to get creative with variations! You could try adding a swirl of raspberry puree to the batter for a more complex berry flavor, or swap the grabeef ham crackers for shortbread cookies for a different crust texture. No matter how you make it, I highly encourage you to give this Pink Strawberry Crunch Cheesecake a try. You won’t regret it!
Frequently Asked Questions:
Can I make this cheesecake ahead of time?
Absolutely! This Pink Strawberry Crunch Cheesecake is actually best made a day in advance. This allows the flavors to meld beautifully and the cheesecake to set properly, ensuring a wonderfully smooth and creamy texture. Just cover it tightly with plastic wrap and refrigerate.
What if I don’t have fresh strawberries?
If fresh strawberries aren’t in season or readily available, you can certainly use frozen strawberries. Thaw them completely and drain any excess liquid before incorporating them into the batter. You might notice a slightly less vibrant pink color, but the flavor will still be delicious!
How can I ensure my cheesecake doesn’t crack?
A common issue with cheesecakes is cracking, but there are a few tricks. Using a water bath (baking the cheesecake in a larger pan filled with water) is highly recommended. Also, avoid over-mixing the batter once the eggs are added, and let the cheesecake cool gradually in the oven with the door ajar before taking it out completely. This slow cooling process helps prevent those unsightly cracks.
Pink Strawberry Crunch Cheesecake
A delightful cheesecake featuring a crunchy Golden Oreo crust and a smooth, pink strawberry-flavored filling, topped with a strawberry whipped cream.
Ingredients
-
20 Golden Oreos, crushed
-
3 tbsp melted butter
-
2 tbsp strawberry Jell-O powder
-
24 oz (3 blocks) cream cheese, softened
-
¾ cup granulated sugar
-
2 large eggs
-
1 tsp vanilla extract
-
½ cup sour cream
-
1 tbsp strawberry extract
-
½ cup fresh strawberry purée
-
1 cup powdered sugar
-
2 tbsp milk
-
1 tsp strawberry extract
-
1 drop pink food coloring
-
1 cup heavy whipping cream
Instructions
-
Step 1
Preheat oven to 350°F (175°C). Combine crushed Golden Oreos and melted butter. Press into the bottom of a 9-inch springform pan to form the crust. Bake for 8-10 minutes. Let cool. -
Step 2
In a large bowl, beat softened cream cheese and granulated sugar until smooth. Beat in eggs one at a time, then stir in vanilla extract, strawberry Jell-O powder, sour cream, and 1 tbsp strawberry extract. -
Step 3
Gently fold in the fresh strawberry purée and pink food coloring until desired color is achieved. -
Step 4
Pour the cream cheese mixture over the cooled crust. Bake for 50-60 minutes, or until the center is almost set. Turn off the oven and let the cheesecake cool in the oven with the door ajar for 1 hour. Remove from oven and let cool completely on a wire rack. -
Step 5
For the topping, in a separate bowl, beat heavy whipping cream until soft peaks form. Gradually add powdered sugar, 1 tsp strawberry extract, and milk until stiff peaks form. Do not overmix. -
Step 6
Spread the strawberry whipped cream topping over the cooled cheesecake. Chill for at least 4 hours, or preferably overnight, before serving.
Important Information
Nutrition Facts (Per Serving)
It is important to consider this information as approximate and not to use it as definitive health advice.
Allergy Information
Please check ingredients for potential allergens and consult a health professional if in doubt.