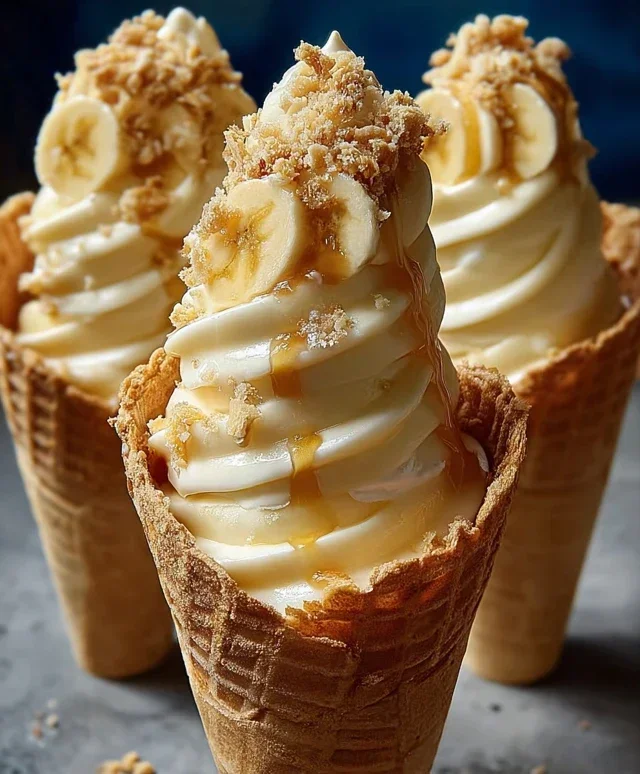
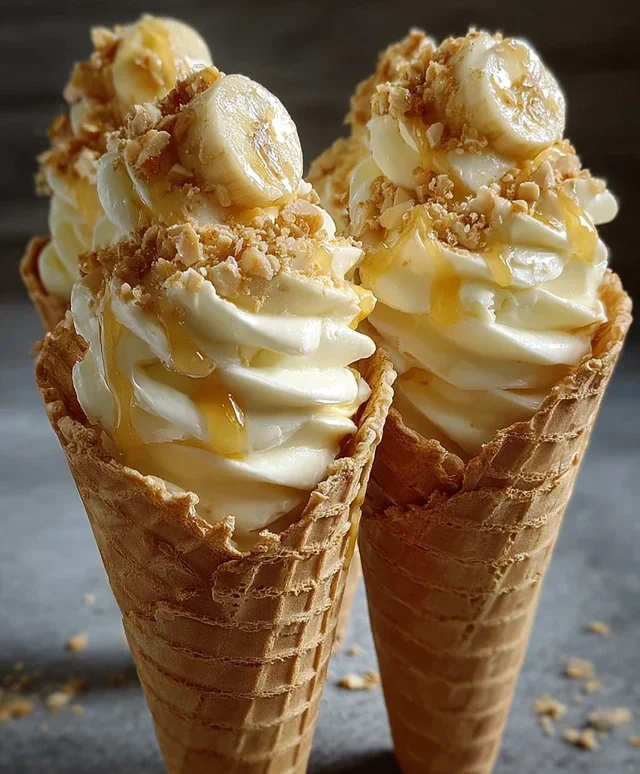
Banana Pudding Cheesecake Cones-Must-Try Dessert
Banana Pudding Cheesecake Cones are here to revolutionize your dessert game! Forget everything you thought you knew about individual treats, because these handheld marvels are about to become your new obsession. Imagin extracte the creamy, dreamy indulgence of classic banana pudding, swirled into a rich, tangy cheesecake filling, all nestled within a crisp, golden waffle cone. It’s a symphony of textures and flavors that appeals to everyone – from the nostalgic lover of grandma’s banana pudding to the sophisticated dessert enthusiast craving a new adventure. What truly sets these Banana Pudding Cheesecake Cones apart is the ingenious fusion of two beloved desserts into one utterly delightful package. Each bite delivers that comforting familiarity of sweet bananas and vanilla wafers, perfectly balanced by the luxurious creaminess of cheesecake, all without the fuss of a fork. Get ready to experience pure dessert bliss, one incredible cone at a time.
Ingredients:
Get ready for a dessert that’s a delightful fusion of creamy cheesecake, comforting banana pudding, and the irresistible crunch of a waffle cone! These Banana Pudding Cheesecake Cones are a showstopper, perfect for impressing guests or simply treating yourself to something truly special. We’re taking all the beloved flavors of a classic banana pudding and transforming them into an elegant, handheld dessert that’s surprisingly easy to make. Imagin extracte a rich, tangy cheesecake filling infused with sweet banana flavor, all nestled within a crispy waffle cone and topped with a decadent drizzle. It’s a symphony of textures and tastes that will have everyone beggin extractg for the recipe. Let’s dive into creating these delightful treats!
Preparing the Creamy Cheesecake Filling
This is where the magic begin extracts. We’ll start by creating a smooth, luscious cheesecake base that will be the heart of our filling. Ensure your cream cheese is properly softened; this is crucial for achieving a lump-free, velvety texture. Leaving it at room temperature for at least an hour is usually sufficient. In a medium bowl, beat the softened cream cheese until it’s completely smooth and creamy. Then, gradually add the powdered sugar, beating until well combined and no sugar granules remain. This step ensures that the sweetness is evenly distributed and the texture is smooth. Next, stir in the vanilla extract. This is a small amount, but it adds a wonderful depth of flavor that complements the cream cheese beautifully.
Now, gently fold in the whipped heavy whipping cream. You want to do this carefully to maintain the airiness of the whipped cream. This step lightens the cheesecake mixture, making it wonderfully creamy and less dense, perfect for spooning into cones. The result should be a light, fluffy, and incredibly smooth cream cheese mixture. Don’t overmix at this stage; just ensure it’s fully incorporated.
Crafting the Banana Pudding Layer
While our cheesecake base is ready, it’s time to bring in the star flavor: banana pudding! In a separate bowl, whisk together the instant banana pudding mix and the cold milk. It’s important to use cold milk, as this helps the pudding thicken properly and quickly. Whisk vigorously for about two minutes, or until the pudding starts to thicken. Instant pudding is designed to set up fast, so you’ll notice it becoming thicker as you whisk. Let this pudding mixture sit for about 5 minutes to fully set and achieve its characteristic pudding consistency. Once set, gently fold this banana pudding into the prepared cream cheese mixture. You’re aiming for a marbled effect or a fully blended creamy banana cheesecake filling, depending on your preference. Folding it gently ensures that the cheesecake filling remains light and airy.
Assembling the Banana Pudding Cheesecake Cones
Now for the fun part – assembling our cones! Take your waffle cones and carefully spoon the creamy banana cheesecake filling into each one. Don’t be afraid to mound it generously! You want a substantial amount of this delicious filling in every bite. After filling the cones, it’s time for a delightful crunch. Sprinkle the crushed vanilla wafers or grabeef beef ham crackers over the top of the filling. This adds a wonderful texture and a hint of salty-sweet goodness that contrasts beautifully with the creamy filling. If you’re using grabeef beef ham crackers, their unique flavor profile can add an interesting savory note to the dessert. This layer of crushed cookies also helps to create a nice base if you’re planning on standing them up.
Chilling and Garnishing
Once your cones are filled and sprinkled, it’s crucial to let them chill. Place the assembled cones in the refrigerator for at least 30 minutes. This allows the filling to firm up properly, making it easier to handle and ensuring the flavors meld together beautifully. Chilling is key to achieving that perfect cheesecake consistency in a cone.
Before serving, it’s time for the final flourish! Drizzle generously with caramel sauce or sweetened condensed milk. The caramel adds a rich, buttery sweetness, while sweetened condensed milk provides a classic, creamy topping that’s equally delicious. For an extra touch of texture and visual appeal, sprinkle a few more crushed vanilla wafers on top of the drizzle. You can also add a thin slice of fresh banana on top if you’re feeling fancy! These cones are best enjoyed immediately after chilling and garnishing, so the waffle cone remains crisp.
Tips for Success
If you find that your cream cheese is difficult to soften, you can gently warm it in the microwave for 15-20 second intervals, being careful not to melt it. For the whipped cream, make sure your bowl and whisk are cold; this helps the cream whip up to stiff peaks more easily. If you don’t have a whisk, a hand mixer or stand mixer will make quick work of this. When folding the pudding into the cream cheese mixture, you can choose to gently swirl them together for a beautiful marbled effect, or mix them completely for a uniform banana cheesecake flavor. Don’t overfill the cones; leave a little space at the top for the toppings. If you plan on making these ahead of time, it’s best to add the crushed wafers and drizzle just before serving to maintain their crispness. Enjoy every delightful bite of these unique and delicious Banana Pudding Cheesecake Cones!
Conclusion:
There you have it – a recipe for delightful Banana Pudding Cheesecake Cones that I truly hope you’ll enjoy making and devouring! This dessert brilliantly marries the creamy, decadent richness of cheesecake with the nostalgic comfort of banana pudding, all nestled within a crisp, edible cone. It’s a fantastic way to elevate a classic flavor profile into something truly special and visually appealing. The contrast in textures – the smooth, tangy cheesecake filling, the soft, sweet banana slices, and the crunchy waffle cone – creates an unforgettable sensory experience. These cones are perfect for parties, a unique dessert for family gatherings, or even just a personal treat when you crave something extraordinary.
For serving, I love presenting them as individual desserts, perhaps with a drizzle of caramel sauce or a sprinkle of crushed grabeef ham crackers for added flair. You can also get creative with variations! Consider adding a swirl of chocolate ganache to the cheesecake filling, or incorporate some toasted pecans for an extra layer of flavor and crunch. If bananas aren’t your favorite, try substituting with berries or even adding a hint of cinnamon to the cheesecake mixture. I truly encourage you to give these Banana Pudding Cheesecake Cones a try. They are surprisingly manageable to create and the results are always met with rave reviews. Happy baking!
Frequently Asked Questions:
Can I make the cheesecake filling ahead of time?
Absolutely! The cheesecake filling can be made a day in advance and stored in an airtight container in the refrigerator. This can save you time on assembly day, making the entire process much smoother. Just ensure it’s well-covered to prevent it from absorbing any odors from other foods.
How should I store leftover Banana Pudding Cheesecake Cones?
Leftovers are best stored in an airtight container in the refrigerator. It’s a good idea to place a piece of parchment paper between layers if you’re stacking them to prevent the cones from sticking to each other. They’re typically best enjoyed within 1-2 days for optimal texture.
What kind of cones work best?
Waffle cones or sugar cones are ideal for this recipe due to their sturdiness and ability to hold the filling. Avoid very thin or brittle cones, as they might not support the weight of the cheesecake. Pre-made cones are perfectly fine, or you can make your own if you have a cone maker!
Banana Pudding Cheesecake Cones
A delightful fusion of creamy banana pudding and rich cheesecake, served in crispy waffle cones.
Ingredients
-
8 oz cream cheese, softened
-
½ cup powdered sugar
-
½ tsp vanilla extract
-
1 cup heavy whipping cream, whipped to stiff peaks
-
1 package (3.4 oz) instant banana pudding mix
-
2 cups cold milk
-
8 waffle cones
-
½ cup crushed vanilla wafers
-
Caramel sauce drizzle
-
Extra crushed vanilla wafers
Instructions
-
Step 1
In a large bowl, beat together the softened cream cheese, powdered sugar, and vanilla extract until smooth and creamy. -
Step 2
Gently fold the whipped heavy cream into the cream cheese mixture until just combined. -
Step 3
In a separate bowl, whisk together the instant banana pudding mix and cold milk according to package directions until thickened. Let it sit for 5 minutes. -
Step 4
Fold the thickened banana pudding into the cream cheese mixture until thoroughly combined and a uniform color. -
Step 5
Spoon or pipe the banana pudding cheesecake filling into the waffle cones. -
Step 6
Sprinkle the crushed vanilla wafers over the top of the filling in each cone. -
Step 7
Drizzle with caramel sauce. -
Step 8
Garnish with extra crushed vanilla wafers before serving.
Important Information
Nutrition Facts (Per Serving)
It is important to consider this information as approximate and not to use it as definitive health advice.
Allergy Information
Please check ingredients for potential allergens and consult a health professional if in doubt.