Easy Bunny Rabbit Cake Recipe- Fun Easter Treat
Bunny Rabbit Cake is more than just a dessert; it’s a celebration waiting to happen! There’s something utterly enchanting about bringin extractg this whimsical creation to life, isn’t there? Whether you’re planning a spring fête, a child’s birthday party, or simply want to add a touch of playful magic to your table, a Bunny Rabbit Cake is guaranteed to be the star of the show. What makes this cake so beloved? It’s the sheer joy it inspires, the delighted squeals of children (and adults!) when they see those adorable ears and sweet face. It’s a project that sparks creativity and allows for personal touches, making each Bunny Rabbit Cake a truly unique masterpiece. Get ready to hop into the kitchen and create a dessert that’s as fun to make as it is to devour!
Bunny Rabbit Cake
Get ready to hop with joy! This Bunny Rabbit Cake is the perfect centerpiece for any spring celebration, Easter gathering, or just a fun weekend baking project. It’s a delightful vanilla cake, shaped and decorated to look like an adorable bunny, making it a guaranteed hit with kids and adults alike. Don’t be intimidated by the shaping; we’ll break it down step-by-step so you can create a charming bunny that tastes as good as it looks. This recipe is designed to be straightforward, with plenty of tips to ensure your cake is a showstopper.
Ingredients:
Baking the Cake
The foundation of our adorable bunny is a delicious vanilla cake. For this recipe, we’ll need two different sized cake pans to create the bunny’s body and head. A 9-inch round cake pan will serve as the body, and a 1.5-quart oven-safe bowl (like a Pyrex or ceramic bowl) will be perfect for the bunny’s head. Ensure your oven is preheated to 350°F (175°C). Grease and flour both your 9-inch round pan and your oven-safe bowl thoroughly. This step is crucial to prevent the cakes from sticking, which can be a disaster when you’re trying to shape them. For the bowl, you might want to use a bit of extra grease or even line it with parchment paper if you’re concerned.
In a medium bowl, whisk together the all-purpose flour, baking powder, and salt. This dry mixture will provide the structure and lift for our cake. In a separate large bowl, cream together the softened butter and granulated sugar until light and fluffy. This process incorporates air, which contributes to a tender crum extractb. Next, beat in the eggs one at a time, ensuring each is fully incorporated before adding the next. Then, stir in the vanilla extract. Gradually add the dry ingredients to the wet ingredients, alternating with the milk, begin extractning and ending with the dry ingredients. Mix until just combined; overmixing can lead to a tough cake. Divide the batter evenly between the prepared round pan and the oven-safe bowl. Bake the round cake for 30-35 minutes, and the cake in the bowl for 40-50 minutes, or until a wooden skewer inserted into the center comes out clean. Let the cakes cool in their pans for about 10-15 minutes before inverting them onto a wire rack to cool completely. It’s vital that the cakes are entirely cool before you attempt to frost and assemble them; warm cake is fragile and will crum extractble.
Making the Frosting
While our cakes are cooling, let’s whip up a delicious buttercream frosting that’s perfect for decorating. In a large bowl, beat the softened butter until creamy. Gradually add the confectioners’ sugar, alternating with the milk or cream, until the frosting reaches your desired consistency. Add the vanilla extract and beat until smooth and fluffy. If the frosting seems too thick, add a little more milk or cream, a teaspoon at a time. If it’s too thin, add more confectioners’ sugar, a tablespoon at a time. This frosting is sturdy enough to hold its shape for decorating but also wonderfully creamy and delicious. You can also divide this frosting into smaller portions to color it. A touch of pink food coloring can be used for the bunny’s ears and nose, and brown can be used for eyes or whiskers.
Assembling the Bunny
Once our cakes are completely cool, it’s time for the fun part: assembly! We’ll need to do a bit of trimming to get our shapes just right. Take the cake baked in the bowl and trim the rounded bottom so it sits flat. This will be the bunny’s head. For the body, take the 9-inch round cake and, if it’s domed significantly, carefully trim the top so it’s flat. Now, we need to create the ears. You can do this in a couple of ways. One easy method is to use some of the cake scraps from trimming. Cut two oval shapes from the cake scraps to represent the ears. Alternatively, you can bake a small loaf cake and cut ear shapes from that, or even use two large marshmallows cut in half.
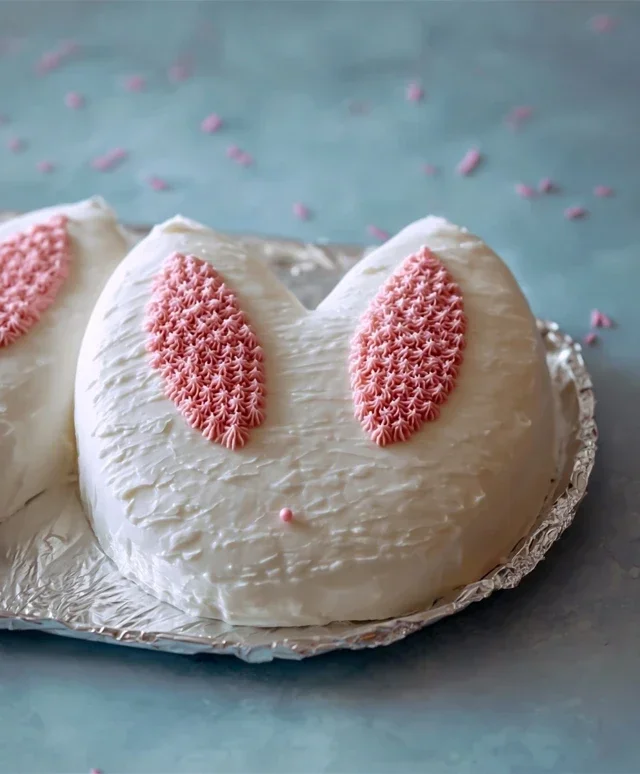
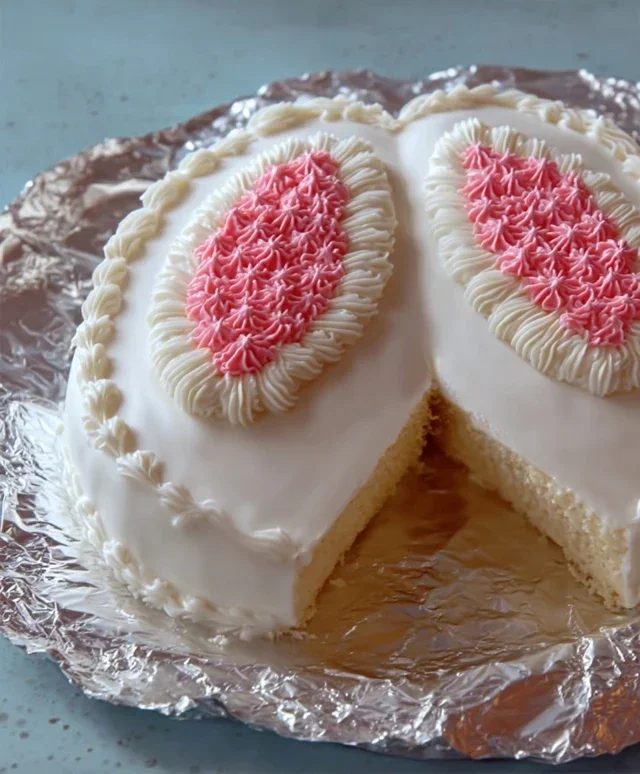
Now, let’s assemble. Place the trimmed round cake on your serving platter or cake board. This is the bunny’s body. Position the trimmed bowl-shaped cake on top, slightly towards the front of the round cake, to create the bunny’s head. Next, attach the ear shapes using a little frosting as “glue.” Place them above the head, angled slightly outwards.
Decorating Your Bunny
This is where your creativity can really shine! Frost the entire bunny cake with your prepared buttercream. Start by covering the head and body with a thin “crum extractb coat” of frosting. This seals in any loose crum extractbs. Chill the cake in the refrigerator for about 20-30 minutes. Once chilled, apply a thicker, final layer of frosting, smoothing it with an offset spatula or the back of a spoon. For a fluffy bunny texture, you can use a star-shaped piping tip to create fur-like swirls all over the cake.
Now for the details! If you’ve colored some frosting pink, use it to decorate the inside of the bunny’s ears and for its nose. You can pipe small dots for eyes, or use mini chocolate chips. For whiskers, you can use thin strips of licorice or pipe them on with a fine tip. Don’t forget to add a fluffy cotton tail! You can use a dollop of white frosting or even a marshmallow for this. Take your time and have fun with it. Even if it’s not perfectly sculpted, the charm of a homemade bunny cake is undeniable. Enjoy the delightful reactions!
Conclusion:
I hope you’ve enjoyed learning how to create this adorable and delicious Bunny Rabbit Cake! It’s a truly magical centerpiece for any springtime celebration, Easter gathering, or even a whimsical birthday. The beauty of this recipe lies in its simplicity and the joy it brings to both bakers and eaters. It’s a fantastic way to inject some fun into your baking adventures, and the smiles it elicits are truly priceless. Imagin extracte the delight on the faces of children (and adults!) when they see this charming bunny hop onto the dessert table!
For serving, this cake is wonderful on its own, but I also love pairing it with fresh berries or a dollop of whipped cream. For variations, don’t be afraid to experiment! You could try different cake flavors like lemon or carrot cake. For a chocolate bunny, simply use your favorite chocolate cake recipe. You can also get creative with the decorations – colorful sprinkles, fondant flowers, or even little candy carrots can add an extra special touch. I wholeheartedly encourage you to give this Bunny Rabbit Cake recipe a try. It’s a rewarding bake that’s sure to become a cherished tradition!
Frequently Asked Questions:
How far in advance can I bake the cake layers?
You can bake the cake layers up to two days in advance. Once cooled completely, wrap them tightly in plastic wrap and store them at room temperature. This allows you to get ahead of your baking and focus on the decorating on the day of your event.
Can I use a boxed cake mix instead of from scratch?
Absolutely! While I love the flavor of a homemade cake, a good quality boxed cake mix will work perfectly well for this recipe. Just follow the package instructions for baking time and temperature.
What kind of frosting is best for decorating the bunny?
A stable buttercream frosting is ideal for decorating. It holds its shape well, making it perfect for piping details like the fur, eyes, and nose of your bunny. Cream cheese frosting can also work, but it might be a bit softer, so pipe with a slightly firmer consistency.
Bunny Rabbit Cake
A whimsical and delicious cake shaped like a bunny rabbit, perfect for Easter or any celebration.
Ingredients
-
2 cups all-purpose flour
-
1.5 cups granulated sugar
-
1 teaspoon baking soda
-
0.5 teaspoon salt
-
1 cup unsweetened applesauce
-
0.5 cup vegetable oil
-
2 large eggs
-
1 teaspoon vanilla extract
-
1 cup milk
-
Buttercream frosting (for decorating)
Instructions
-
Step 1
Preheat oven to 350°F (175°C). Grease and flour a bunny-shaped cake pan or two 8-inch round cake pans. -
Step 2
In a large bowl, whisk together flour, sugar, baking soda, and salt. -
Step 3
In a separate bowl, combine applesauce, vegetable oil, eggs, and vanilla extract. Whisk until well combined. -
Step 4
Pour the wet ingredients into the dry ingredients and mix until just combined. Gradually add the milk and mix until the batter is smooth. -
Step 5
Pour the batter into the prepared cake pan(s). If using round pans, one will be the body and the other for ears and tail. Bake for 25-35 minutes, or until a toothpick inserted into the center comes out clean. -
Step 6
Let the cake(s) cool in the pan for 10 minutes before inverting onto a wire rack to cool completely. -
Step 7
Once completely cool, assemble the bunny shape if using round pans, then frost the cake generously with buttercream frosting, decorating to resemble a bunny rabbit.
Important Information
Nutrition Facts (Per Serving)
It is important to consider this information as approximate and not to use it as definitive health advice.
Allergy Information
Please check ingredients for potential allergens and consult a health professional if in doubt.